Basic Mapping
If you are a new mapper, read this page from top to bottom. Every word. Every picture. This page will give you all the info and best practices you need to make a solid first map!
Ready to Map?
Have you...
- [x] Downloaded Audacity and chosen a map editor?
- [x] Set up your audio file to confirm your bpm and make sure you've got a good intro/outro?
- [x] Exported your song file as an OGG?
Are all these things done?
GREAT! You're ready to dive into your favorite editor and start mapping! If not, click the links on the task list for more information.
The Essentials
Before you can even think about mapping, you need to understand the basics.
Map Files
Regardless of what editor you choose to map with, every map needs:
- Song File: OGG format, you must have this ready before you can map. Name it
song.ogg - Cover Image: JPG or PNG, must be perfectly square and 512 pixels per side is recommended. You must have this before you can release your map. Name it
cover.jpgorcover.png - Info File: All of the metadata for your map as a whole. Things in this file apply to ALL difficulties (i.e., song name, artist name, mapper name, song file name, cover image name, difficulty note jump speed, etc.). This file is automatically created by your editor.
- Difficulty Files: One per difficulty in your map. Things in this file apply to just the one difficulty (i.e., note placement, light placement, etc.). These files are automatically created by your editor.
Some editors will automatically create an Autosaves folder where you can retrieve older copies of your work if needed. When you're ready to prepare your song for upload you must have a minimum of four files.
WARNING
While Beat Saber has support for multiple languages (English, French, German, Spanish, Japanese, and Korean), special characters in other languages such as Arabic(اَلْعَرَبِيَّةُ), Chinese (汉语/漢語), and Kaomoji (٩(◕‿◕。)۶), are not fully supported. Using these characters in song metadata or in bookmarks can cause problems.
Block Types
| Directional Blocks | Dot Blocks | Bombs | Walls |
|---|---|---|---|
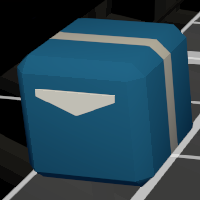 | 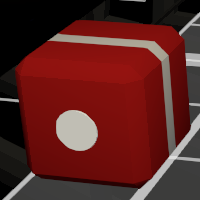 | 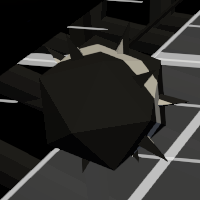 | 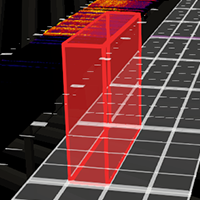 |
| Must be hit in the direction of the arrow | Can be hit in any direction | Causes damage when struck but safe for players | Damages players but ok to rest sabers |
A few notes about walls:
- Standard walls can be read by any headset and have the highest compatibility. New mappers should stick with these until they're a bit more experienced.
- There are a few types of "hack" walls that do not require mods: fast walls (fly by you fast), hyper walls (fly by you SUPER fast), and fake walls (look like normal walls but don't cause damage).
- While these wall types are supported in community editors, they exploit base game mechanics and is not intended behaviour.
- Read up more on base game walls in Intermediate Mapping and "fancy" mapping/noodle extensions walls in Extended Mapping
A few notes about bombs:
- Bomb hitboxes are smaller than block hitboxes, smaller even than the bomb model itself.
- Bombs are hard to see when there are no lighting events active. Make sure your map isn't dark when bombs are coming up. See Basic Lighting for more tips.
- Bombs can still be hit once they have passed the player.
Block Distribution
This varies based on the target difficulty and audience you are mapping for. For example, some players in the lower difficulties might be overwhelmed by a balanced distribution across the three rows compared to a more experienced player that can handle multiple jumps across the rows. Block distribution can also vary between mapping styles at the same difficulty level.
For more on row usage in different difficulties, see Gauging Difficulty.
TIP
If you're using Mediocre Map Assistant 2 as your editor you can hit SHIFT+TAB to open the error checker then click the Stat Panel button to see this breakdown.
Timing & Rhythm
Before you start mapping in earnest you need to think about the rhythm of the song you want to map. You'll place blocks on one or more of the main instruments in the song: the drum beat, lead instrument, bass, synths, or even vocals.
To place blocks in time with the rhythm you'll need to change your cursor precision. Most (but not all) songs will use 1/1, 1/2, or 1/4 cursor precision to get on beat. Some songs may use "triplets" or 1/3 cursor precision which can be hard to tell from 1/4 to an inexperienced ear. You should not need to use less than 1/4 cursor precision for most songs including mapping to vocals.
WARNING
90% of the time, mapping with high precision (1/16, 1/32, or 1/64) will make your song mistimed. If you need high precision to get your notes to line up then you have an issue with your audio file setup. STOP and review Basic Audio Setup to ensure you're in sync!
| 1/1 Cursor Precision | 1/2 Cursor Precision | 1/3 Cursor Precision | 1/4 Cursor Precision |
|---|---|---|---|
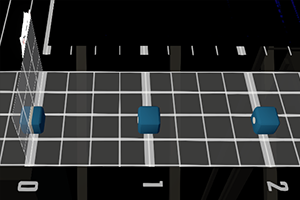 | 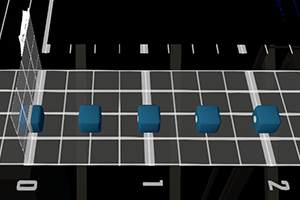 | 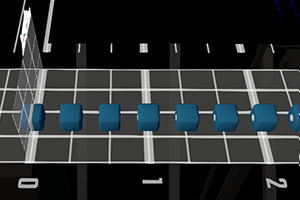 | 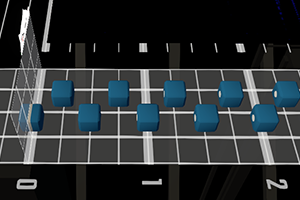 |
| 1 block per beat | 2 blocks per beat | 3 blocks per beat | 4 blocks per beat |
When timing out your map you'll want to double check EARLY that the waveform in your editor is lined up with the major lines of the editor track. If your waveform isn't lined up, revisit the Basic Audio Setup page of the wiki for tips.
CAUTION
If your waveform isn't lined up it will make it very difficult to place blocks in time with the music. Get this right before you start or risk remapping later!
| Audio Not Lined Up | Audio Properly Synced |
|---|---|
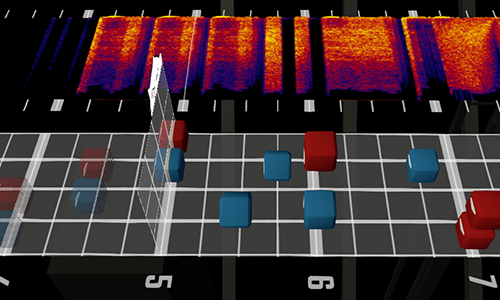 | 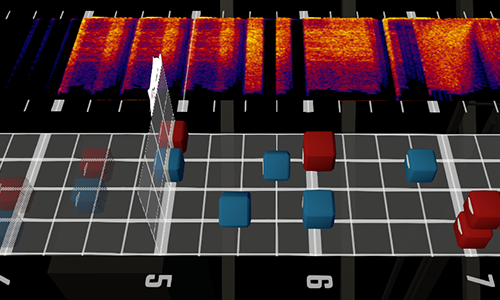 |
| Needs audio edits, start offset, or has wrong bpm | You're ready to map! |
Timing Notes
Consider starting the mapping process with placeholder or "timing" notes. Dropping a "dot note" placeholder can help you figure out whether or not your map is on time and where you should consider using extra emphasis before you invest a ton of time creating patterns. Listen to make sure the editor hit sounds are in time with the beat.
TIP
Not everyone uses timing notes but they can be a helpful way to ensure your maps are timed correctly as a new mapper.
Overmapping & Undermapping
Deliberately place blocks that match the music. Don't place more blocks than necessary just for the sake of making the map difficult. Some songs were never meant to be super-dense ExpertPlus maps and that's ok.
- Overmapping is the (bad) practice of placing more blocks than there are sounds. Don't do it.
- Undermapping is the very acceptable practice of skipping some notes/beats (especially at lower difficulties).
Emphasis & Consistency
We'll go into more detail on this in Intermediate Mapping but, as a new mapper you should understand at least the basic ideas of emphasis and consistency and how they impact your map.
Emphasis is how much "weight" you give each hit.
- Consider the base sound your mapping to to be a single hit (one block), including quiet or chill sections
- When the sound is "bigger" or you have two different instruments hitting on the same beat you can think about using a double hit or a stack (two blocks).
- For only the biggest sounds in the song you could use a double tower (six blocks, three for each hand) or other heavyweight pattern, but many songs never need this amount of emphasis.
Many new mappers instinctively want to use double hits all the time, but remember that those are heavy emphasis and if every sound is emphasized then nothing feels like it has extra weight.
Another way to think about it is that you want the energy and effort of the hit to match the energy and power of the sound. Nobody screams at the top of their lungs on every vocal, or in every instrument note. You want the powerful notes, the powerful vocals, to stand out from the rest of the song. Even if most of the song might sound loud or (you think) emphasized, there's always notes that sound above them. Be it through volume, or through energy. So when mapping, see what is your baseline energy, map that as singles. Anything above that, then do towers/doubles/windows/jumps, whatever best matches that energy.
Consistency is mapping the same sound with the same weight when it appears.
Mapping consistently does NOT always mean to copy/paste/mirror, though there are some times when that is appropriate. If you choose to map a particular big sound as a double, for example, that same sound should usually be mapped with a double.
Pattern Best Practices
This section details the principles one should follow for a playable and enjoyable map.
Cyrix has created a summary video, Patterns to Avoid as a New Mapper, of the most common issues that are covered in this section.
Vision Blocks
Vision blocks are any patterns that obscure the player's vision and make it difficult to sight read a map, if not outright uncomfortable. The primary cause of vision blocks is use of the middle two positions of the track.
Vision blocks can be avoided by:
- Not using the center two positions of the track; or
- Ensuring that blocks following anything in the centre are either far enough away or in another position on the opposite half of the grid; or
- Making sure that your player is pushed to the side with either obstacles or patterns so the center positions no longer completely block the player.
| Ideal Block Placement | Vision Block Placement |
|---|---|
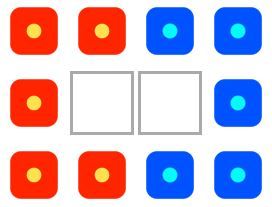 | 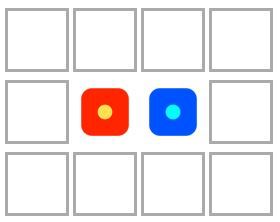 |
| When you're getting started, stick to the perimeter of the track. | These are called face notes. Avoid them as a new mapper. |
TIP
Mediocre Map Assistant 2 has a built-in handy-dandy error checker that can find vision blocks. Learn more in the MMA2 User Guide.
ChroMapper has plugins that can be used to find vision blocks.
Double Directionals & Resets
Double directionals (or DDs) are what you get when you have two blocks of the same color in the same direction within a very short span of time. Diagonals, or any change of only 45 degrees between blocks, are considered to be DDs with both the cardinal directions they combine.
is a DD with both
and
Double directionals cause the player to double their swing speed compared to a "standard" up/down pattern. They have to swing downwards, then bring their hand back up to swing downwards again, which is a lot of unnecessary motion. Alternate the direction of every other block for better flow.
Many new mappers use DDs to simulate the feel of drumming. While this feels like it makes sense, drums have rebound when you hit them and imaginary computer blocks... don't. The game is called Beat Saber, not Beat Drummer!
| Standard Flow | Double Directionals |
|---|---|
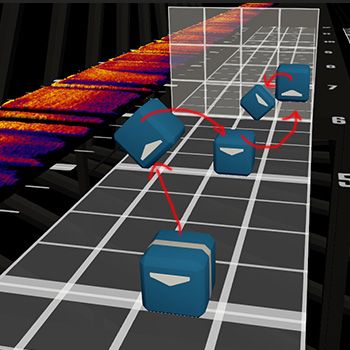 | 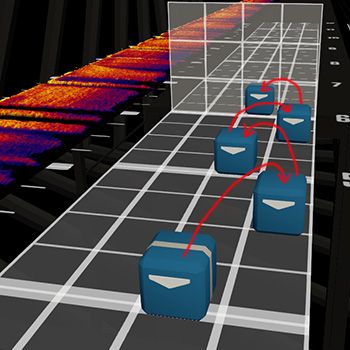 |
| A good mapping practice | Yikes! Don't do this. |
Resets
DDs do have their uses if you give the player enough time to reset their hands back to neutral position and, more importantly, clearly communicate to them that they should reset.
Resets are a motion that requires time to be performed and the player to know that they should do it, despite the lack of notes to cut. There are two main standard ways to make resets work:
Bomb resets (Preferred) Place a line of bombs that will make the player move their hands away from them, typically on the bottom row.
Low NJS and high JD (Only for slower dancey maps) If your map is slow and floaty, you can make a reset work by giving the player time to see the following notes and react to them by resetting.
WARNING
In bomb resets, the reset motion will happen before the bombs. Thus, you should place the bombs closer to the notes that come after than to the notes that come before. Normally at 3/4 or 2/3 of the distance.
It is recommended that bomb resets are used sparingly and preferably with some sound associated to them.
| 3/4 bomb reset | 1/2 bomb reset |
|---|---|
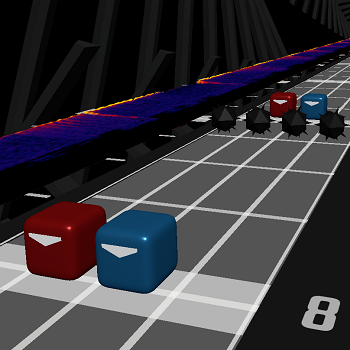 | 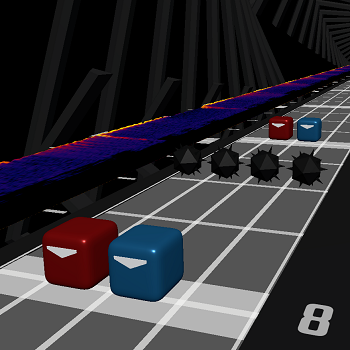 |
| Enough time to reset comfortably | Too close! Jerky uncomfortable motion |
WARNING
Implicit resets will work with lower NJS, higher JD, and adequate patterns; but this will have downsides for faster paced and higher difficulty maps (see Note Jump Speed) and should therefore be avoided in those cases.
Want to learn more about resets? Read Intermediate Mapping!
DO: Mapping with Flow
Outside of easy and normal difficulties, mapping with flow is an absolute must. Human bodies are incredible machines but there are certain ways that joints are meant to move and using patterns that violate those mechanics is a recipe for injuring your player.
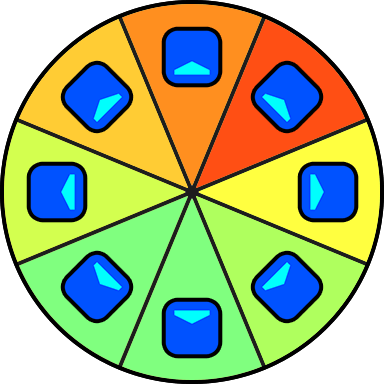
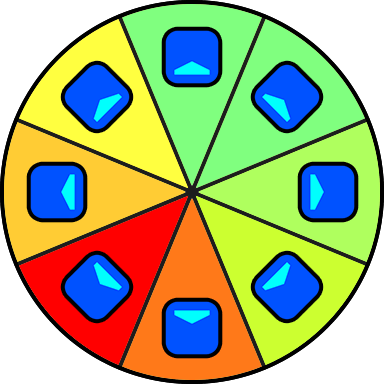
Parity is the concept that each block direction is played with either a backhand swing or a forehand swing. Alternating between foreswing and backhand swings with each block gives a smooth motion between each hit:
- A forehand swing is the motion where the block is hit with the palm of the hand
- A backhand swing is the motion where the block is hit with the back of the hand
The diagram below illustrates how straining it is playing a note as either swing (mirrored for red). Without proper lead in for harsher swings, the player is likely to reset:
| Forehand Swings | Backhand Swings |
|---|---|
 |  |
This video illustrates the concept of parity: YouTube
A thing important to keep in mind, especially if you are new to the game or mapping, is that the concept of parity is most obvious for wrist players. If you do not play with your palm directly facing the ground, then you might struggle to understand why some parity breaks are uncomfortable. Remember that while it may feel fine to you, players have different grips and styles. Proper parity feels good for everyone, not just some playstyles.
TIP
When proper flow is achieved the player should be physically capable of getting full points on each block, even if they don't have the skill or interest in doing so. See the Scoring section of the wiki for more info.
| 0° Angle | 45° Angle | 90° Angle | 135° Angle | 180° Angle |
|---|---|---|---|---|
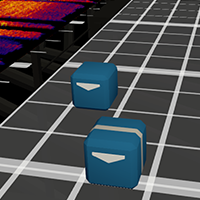 | 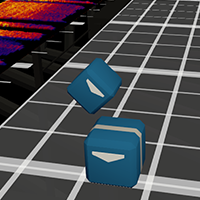 | 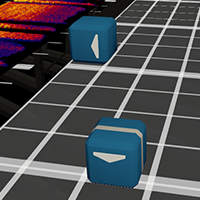 | 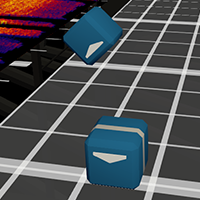 | 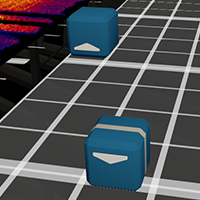 |
| No. (DD) | No. (DD) | Maybe. | Yes. | Yes. |
Basic Flow Concepts:
- The higher your note precision, the more you want to stick to 180° (up/down) and 135° (up/down/diagonal) patterns.
- Larger angle changes should only be considered with enough time to play smoothy.
- Make sure that you have the right setup (the pattern immediately before) and escape (the pattern immediately after) for a comfortable swing at whatever speed you're mapping.
- Be conscious of your timing, you can get away with more in slower BPM songs with the same note precision than you can in high BPM songs. Map for the style of song you've selected.
DON'T: Forbidden Patterns
These are called forbidden patterns for a reason. There is no reason in the world to use these because they're dangerous to either the player's hardware, the player's joints, or they go against the scoring system. You may have played maps that included these but that doesn't make them ok.
Handclaps
| Illustration | Editor View | Explanation |
|---|---|---|
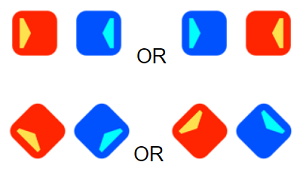 | 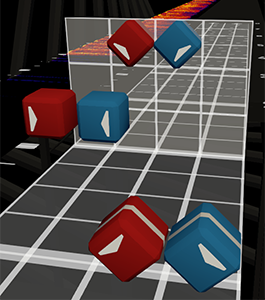 | Do not place blocks that point to each other in close proximity. This motion tells the player to smash their controllers together when playing for max points. Don't do it, no exceptions. Note: Different VR sets have different controllers. Vive wands are much bigger than Oculus touch controllers and Index knuckles... don't put your players' hardware at risk! AKA Controller clash, Controller smash |
Cross
| Illustration | Editor View | Explanation |
|---|---|---|
 | 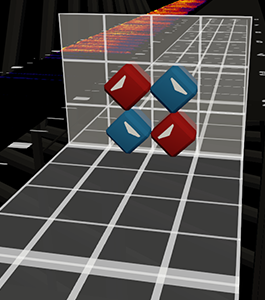 | The pattern is a handclap which can lead to smashed controllers. It can also cause tangled arms and ugly vision blocks. Inexperienced players will likely not read it correctly. Use a different pattern altogether. |
Hammer Hits
| Illustration | Editor View | Explanation |
|---|---|---|
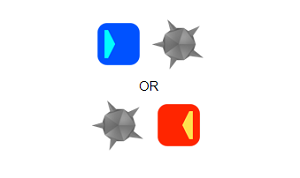 | 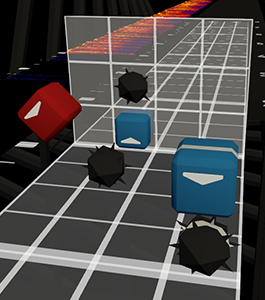 | Do not place a directional block that points towards a bomb on the same plane. This undermines the scoring system (and is just evil). Don't do it. No exceptions. |
Disembodied notes
| Illustration | Editor View | Explanation |
|---|---|---|
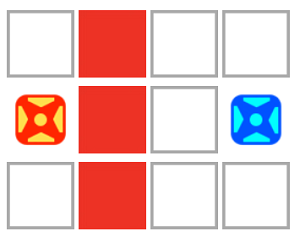 | 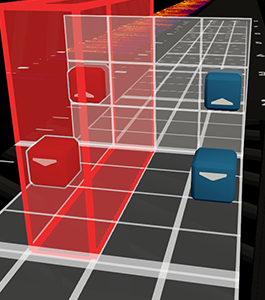 | Do not hide blocks on the other side of walls. Walls obscure vision and it can be very difficult to see blocks on the other side. The player also loses haptic feedback of hitting a block correctly as the saber must also move through the wall. |
Rapid Wall Dodge
| Illustration | Editor View | Explanation |
|---|---|---|
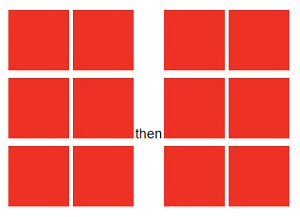 | 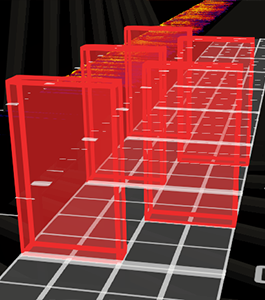 | Do not force the player to very quickly move from one side of their play space to the other. Keep head movement smooth and predictable. Wall dodges are fine (and fun!) to use but allow ample time for the player to switch sides especially for higher BPM songs. You don't want to risk them bumping into things or falling over. |
Danger Dash
| Illustration | Editor View | Explanation |
|---|---|---|
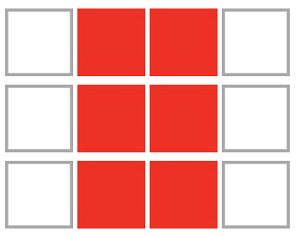 | 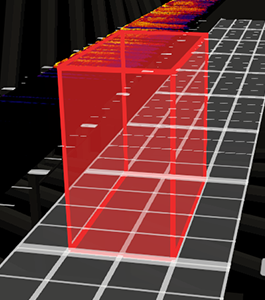 | Never force the player into the far edge of their playspace with 3-width walls or a 2-width wall in the middle. Walls that encompass the two middle columns gives the player very little room to play, and you don't know how large their play area is or how far they will dash in response to these walls. |
Bomb Spam
| Illustration | Editor View | Explanation |
|---|---|---|
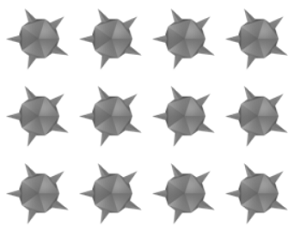 | 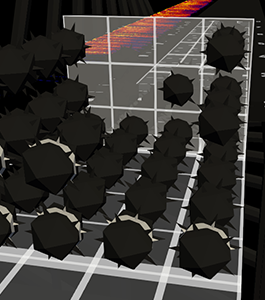 | Bombs are good for forcing precision, or for punctuating silence, but overuse of bombs should be avoided. Also note that some people hate bombs in general, so they should be used sparingly. |
Bomb Wall
| Illustration | Editor View | Explanation |
|---|---|---|
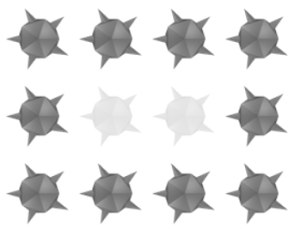 | 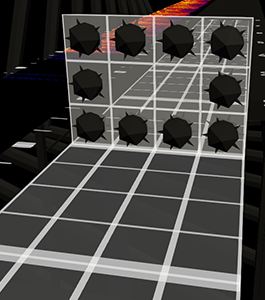 | Do not fill the entire playspace with bombs. In addition, bombs that force the player to point their sabers straight ahead are heavily discouraged. This creates a poor and ambiguous setup to hit any blocks afterwards. |
Hidden Blocks
| Illustration | Editor View | Explanation |
|---|---|---|
 | 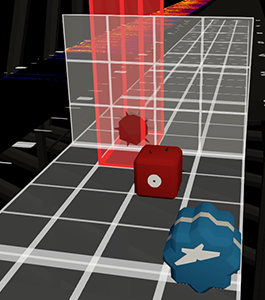 | Blocks should never be stacked on top of one another or in walls. These hinder visibility of blocks. Any combination of blocks are technically stackable in the editor (including bombs and walls). These are hard to spot if two identical blocks are stacked. Use the error checker in MMA2 or a plugin in CM to find these! |
Hitbox Abuse
| Illustration | Editor View | Explanation |
|---|---|---|
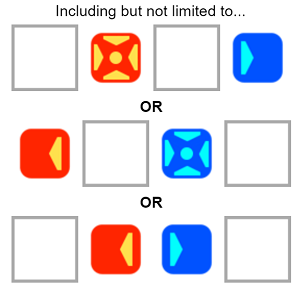 | 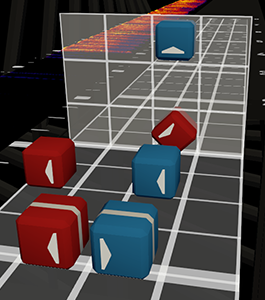 | Ensure there is room for the player to swing at each block. In the patterns depicted here, there is not enough room for the saber to slice each block without hitting the other. These are technically still possible to hit, but only by coming in at an angle, and if you have to come in at an angle, you may as well change the block direction to a diagonal anyway. The illustration below from Split, one of the game developers, shows the size of the block hitbox. The large outer box is for good hits and the small inner box is for bad hits. 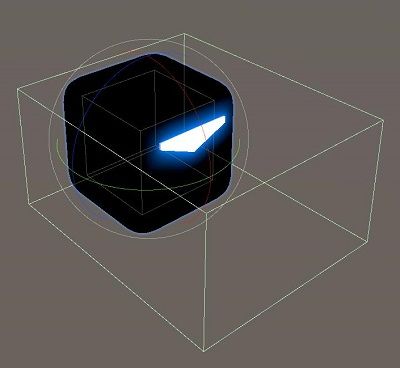 |
Wide Precision
| Illustration | Editor View | Explanation |
|---|---|---|
 | 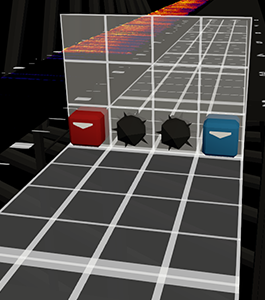 | These bombs are incredibly hard to avoid for players with short arms. When the player swings through these blocks, their arms come inward, and hit the bombs. |
MAYBE: Highly Situational Patterns
These patterns are OK to use but only in very specific circumstances or with very specific setup. It's best to steer clear of these until you're much more comfortable with mapping.
Triangle
| Illustration | Editor View | Explanation |
|---|---|---|
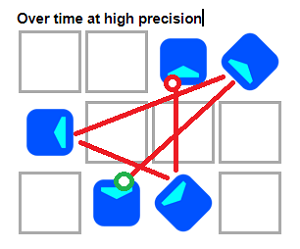 | 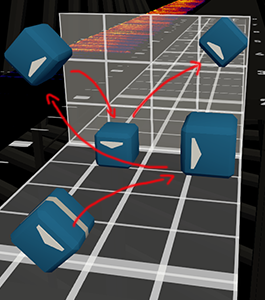 | Triangles are patterns that cause incredibly uncomfortable resets due to excession rotation in one direction. The pattern breaks the forehand/backhand mechanic. See the Mapping with Flow to revisit this explanation. Note 1: Not all triangle shaped patterns are cursed triangles. Note 2: This sort of pattern plays differently at Hard difficulties and below when there are a couple of beats between each swing but stay away at Expert and ExpertPlus. |
Flicks
| Illustration | Editor View | Explanation |
|---|---|---|
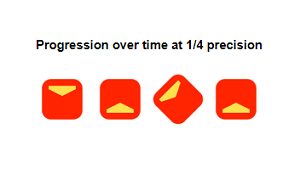 | 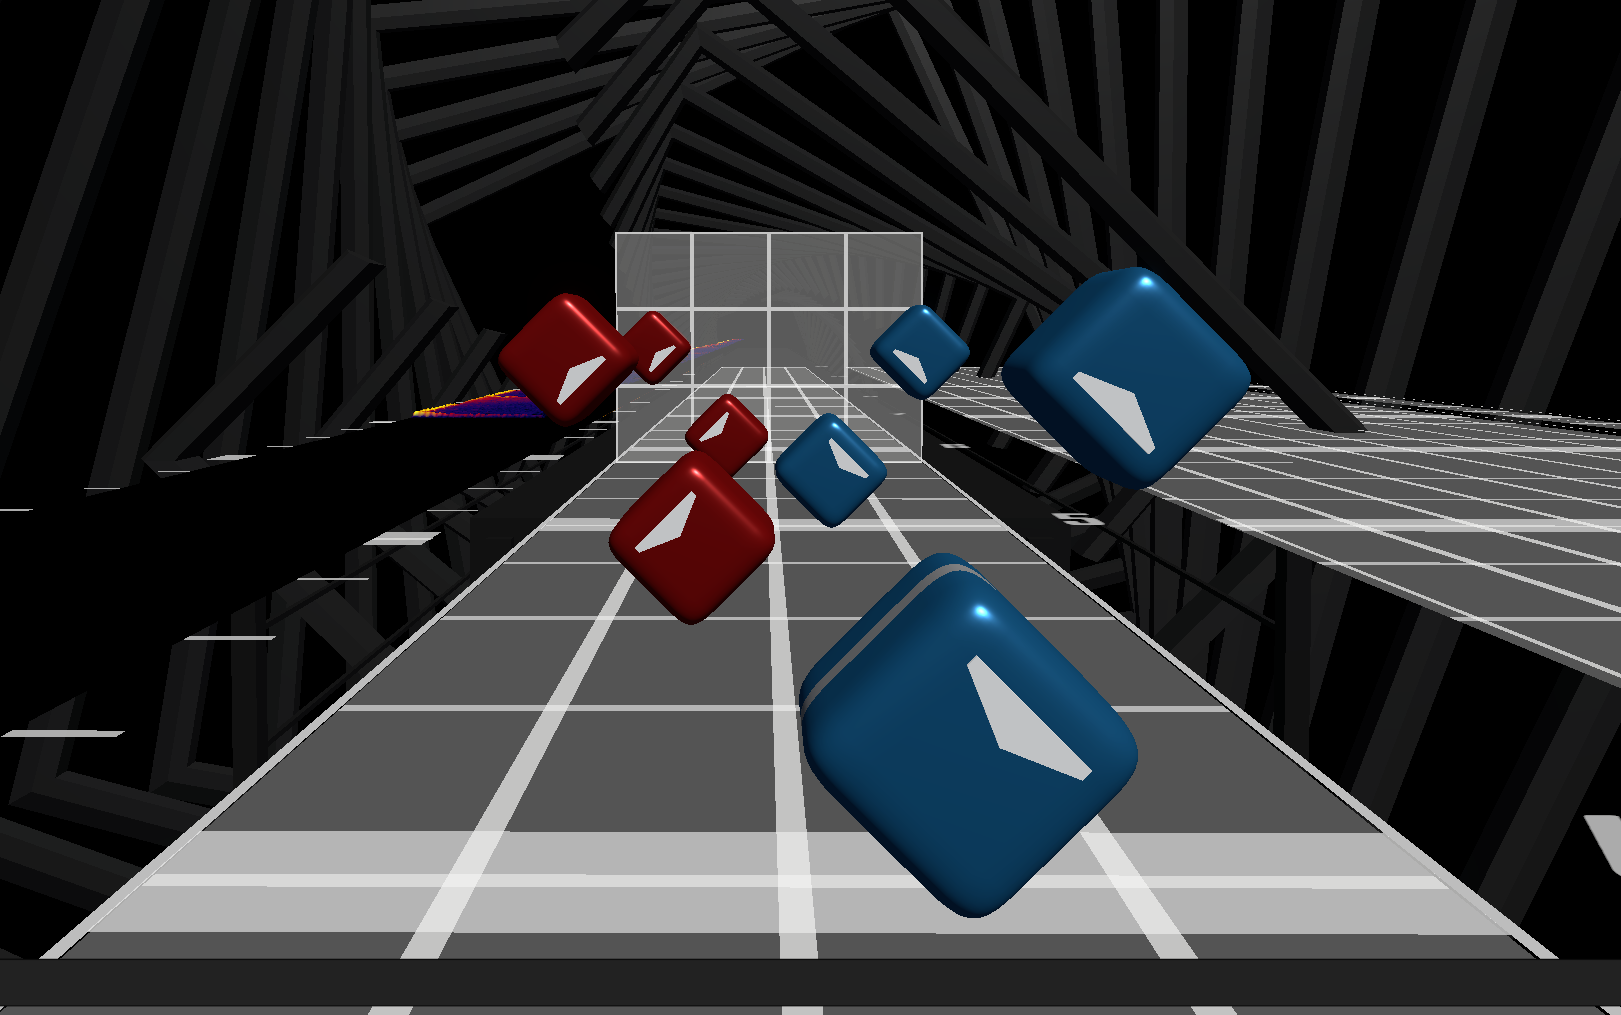 | "Flicks" of two or more blocks of the same color at high precision (like 1/4 or faster) require very fast movement on one hand. Keep in mind whether the player can hit these blocks at faster speeds to ensure that this pattern is not an unwarranted difficulty spike. |
Incorrect Side Hits
| Illustration | Editor View | Explanation |
|---|---|---|
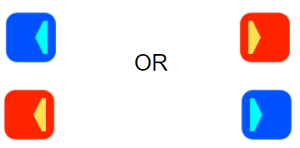 | 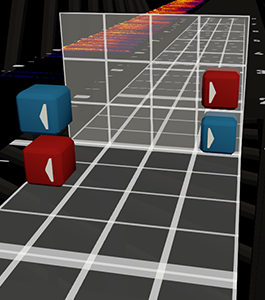 | Generally speaking, when making a double crossover, you should put RED on top when slicing left, and put BLUE on top when slicing right. This is because the saber that swings into the opposite lane naturally swings at a slight downward angle rather than perfect horizontal. The exception is Expert/ExpertPlus, but only if the flow of patterns leads to these placements naturally. |
Rapid Crossovers
| Illustration | Editor View | Explanation |
|---|---|---|
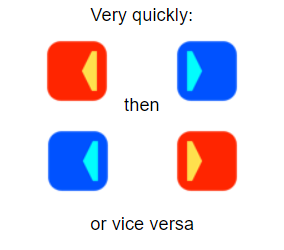 | 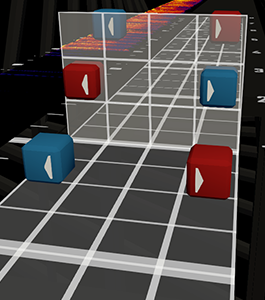 | Give the player time to prepare, and don't make them cross sides too fast or too often. This pattern takes time to process and it's a larger motion in-game than it looks in the editor. It's also recommended to offset the hits and place each note different rows to reduce handclap risk. |
Wide Inward Doubles
| Illustration | Editor View | Explanation |
|---|---|---|
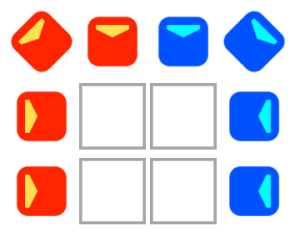 | 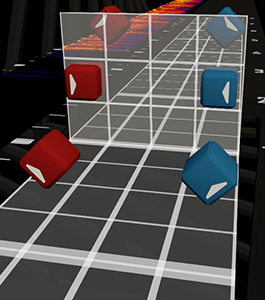 | Inward facing double blocks on the edges or downward facing blocks on the top row are very difficult to hit for small/short players, and uncomfortable for the rest. This should generally be avoided. The exception is Expert/ExpertPlus, but only if the flow of patterns leads to these placements naturally. |
Excessive Towers
| Illustration | Editor View | Explanation |
|---|---|---|
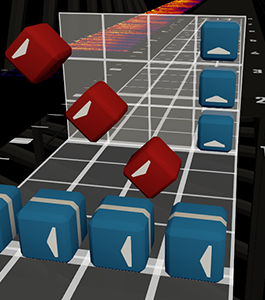 | Be mindful when using many towers in succession. Placing 3-4 blocks of the same color, vertically or horizontally, require larger and faster swings. Overusing towers can lead to overemphasis and player fatigue. |
Awkward Curves
| Illustration | Editor View | Explanation |
|---|---|---|
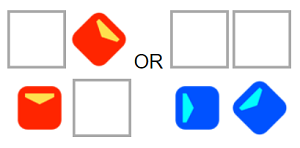 | 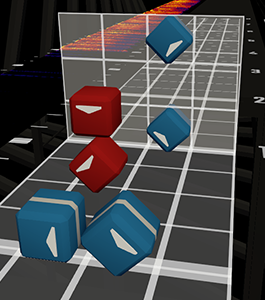 | Do not place two or more blocks of the same color together that do not properly lead into each other. Hitting these blocks properly requires the player to abuse the angle lenciency by ignoring the direction and playing if as they were the same direction. Because of this, you should these blocks in same direction. |
Detached Walls
| Illustration | Editor View | Explanation |
|---|---|---|
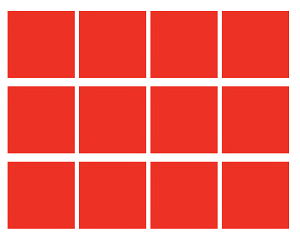 | 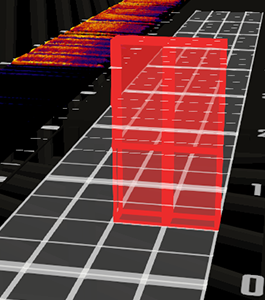 | Combine your adjacent/touching walls for a cleaner, less visually cluttered experience. Don't ever cover the entire grid with walls as depicted in the illustration. |
Extended Crouch
| Illustration | Editor View | Explanation |
|---|---|---|
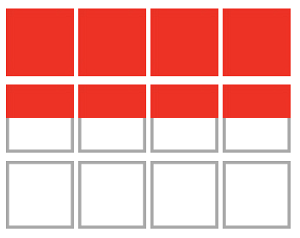 | 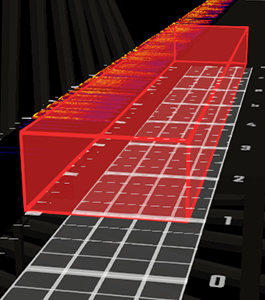 | Consider your target audience when using extended sections of crouch walls. You can't predict all players' physical ability, so use this in moderation. If you have notes during or immediately following a crouching section, consider visibility due to the player's lower position. When the player is crouched, centre blocks in bottom row become vision blocks. |
Corner Crouch
| Illustration | Editor View | Explanation |
|---|---|---|
 | 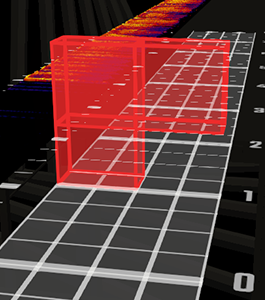 | Consider your target audience when forcing the player to crouch in one corner. As stated above, crouching sections should be kept short because you can't predict all players' physical ability. Forcing the player to additionally move left/right while crouching increases the threshold of full-body range of motion. While this tactic may be fun for some, be mindful that some players are incapable of this motion. |
Sky Streams
| Illustration | Editor View | Explanation |
|---|---|---|
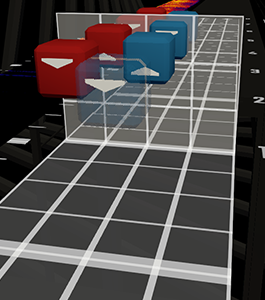 | Avoid repetitive use of blocks in the top row. This causes shoulder strain in addition to top row down notes requiring large swings to score well on. Note: Blocks on the top row in Easy and Normal should be used sparingly. |
Visual Clutter
| Illustration | Editor View | Explanation |
|---|---|---|
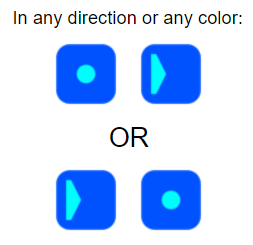 | 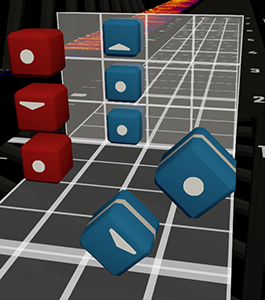 | Avoid unnecessary visual clutter. Having a directional block point towards/away from a dot block does not serve any functional purpose, and it's hard to read at a glance. If you're telling the player to slice in a particular direction, be consistent and make both blocks directional to increase readability. Note: When making sliders, the established community convention is to start with an arrow then use dots afterward. |
Easy to Miss Patterns
| Illustration | Editor View | Explanation |
|---|---|---|
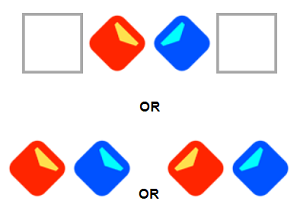 | 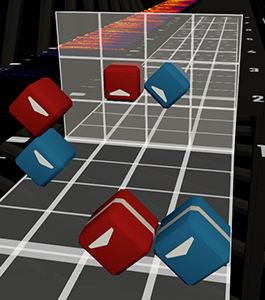 | Generally, try to avoid patterns with overlapping hitboxes, as this makes the pattern difficult to hit consistently. The hitboxes are larger than the note, and most players rarely hit the actual note when they swing, making it easy to hit the smaller hitbox within notes that detects bad hits on patterns like this. See Hitbox Abuse for more info. |
Arm Tangles
| Illustration | Editor View | Explanation |
|---|---|---|
 | 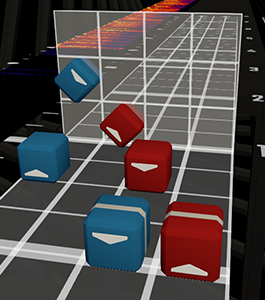 | Crossing hands is usually fine, but crossing hands and going in opposite directions vertically involves more risk. These patterns require very careful setup to avoid players clapping their controllers or arms. Reverse these colors and you're good to go. This is only one example of an arm tangle. Always be aware of where you're leaving your player's arms and how they are going to escape from that position to hit the next pattern. |
Face Punchers
| Illustration | Editor View | Explanation |
|---|---|---|
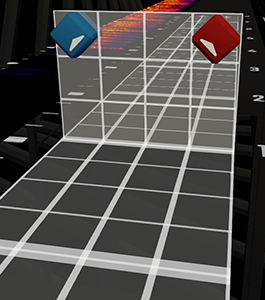 | Face punchers are blocks placed in the opposite top corners pointing outwards. Without proper setup, this placement requires the player to perform a large crossover in a direction that potentially causes their controllers to smash into their headset. A double of face punchers is an especially uncomfortable motion. |
Gauging Difficulty & Down-Mapping
Many mappers tend to map the difficulty level at which they typically play, but there are plenty of benefits to mapping lower difficulties:
- Full spreads can be played and enjoyed by a wider audience.
- They look professional when cruising for new maps, just like the base game maps.
- Players who are good at the game can use your lower difficulties for training, such as accuracy players.
The difficulty of a map is comprised of a combination of density (rhythm choice), complexity (pattern choice). There should be a smooth progression as you work your way down from Expert+ to Easy. When building lower difficulties, it's important to understand what skills players at different levels have and try to preserve the map's identity as you work your way down the spread.
For more information on mapping lower difficulties than what is on this page, check out Downmapping.
Pattern Complexity
Maps should always have a progression of complexity from Easy through Expert+. The difficulty of a map is typically rooted in its complexity, with a great deal of attention given to what a player would typically expect at a respective difficulty level.
Remember
You are teaching players different patterns and sight-reading skills with your maps. Make sure you give them time to react before you throw something new at them at each level of difficulty.
| Difficulty | Pattern Notes |
|---|---|
| Expert+ | ‣ Welcome to the wild west! You can throw any good mapping practices at your player here. ‣ Parity is expected at this level, especially for high BPM songs. Lower BPM songs may be more lenient but parity breaks are discouraged. ‣ Always be mindful of common errors, such as resets and vision blocks. |
| Expert | ‣ All note directions are viable here in any proportion. ‣ All note positions viable here in any proportion. For patterns of wider spacing, give them enough reaction time and be mindful of the player's stamina. ‣ Any color, any lane is fine. Crossovers are fair game however keep sections of extended crossovers short. ‣ Flow is critical. Parity will make or break your map. ‣ All emphasis options are on the table, including stacks and sliders. ‣ All obstacles are fair game, but be wary about creating vision blocks. |
| Hard | ‣ All cardinal directions are viable. Diagonals are less common. ‣ All note positions viable here in any proportion. Top row notes are fine though less common. Make sure the spacing is not tiring for the player. ‣ Any color, any lane is fine. Crossovers are simple and give the player enough time to react and recover afterwards. ‣ Flow is critical unless you have an extended break. Try to maintain parity with every swing. ‣ Most emphasis options are available, including inverted doubles with sabers going opposite directions. Stacks and sliders are fine, but keep them two notes long and don't overuse them. ‣ All obstacles are fair game, but be wary about creating vision blocks. |
| Normal | ‣ All cardinal directions are viable. Diagonals are uncommon for this level. ‣ Notes should lie mostly in the bottom row. Use the middle row as a flourish for emphasis. Use the top row sparingly with dot notes only. ‣ Keep red notes primarily on the left side and blue on the right. Avoid crossovers entirely. ‣ Players will tend to reset after every hit, but you can introduce flow when the notes are close together. ‣ Inverted doubles are manageable, but don't overuse them. Stacks and sliders should be scarce. ‣ If obstacles are used, keep them simple. You can sprinkle in notes simultaneously, but give plenty of time to react and recover. |
| Easy | ‣ All cardinal directions are viable. Diagonals are very uncommon for this level. ‣ Notes should mostly lie in the bottom row. Use the middle row as a flourish for emphasis. Use the top row very sparingly with dot notes only. ‣ Keep red notes primarily on the left side and blue on the right. Avoid crossovers entirely. ‣ Knock yourself out with parity breaks. Players will reset after every hit. ‣ Avoid inverted doubles. Sliders and stacks are not recommended. ‣ If obstacles are used, keep them simple. Any simultaneous notes must be simple and clearly readable. |
Note Density
NPS is a measure of note density, or the number of notes measured within a certain interval of time. The NPS ranges for each difficulty will fluctuate depending on the map, but it is common to reduce the note density of each difficulty by 20% or more as you work your way down the spread.
The table below provides a range of NPS values calculated from all base game maps, so you can use these values as a recommended baseline for where your values may lie. For more information on the typical NPS ranges across each of the base game maps, check out the Beat Saber Map Analysis tracker.
| Difficulty | NPS Ranges |
|---|---|
| Easy | 0.82 - 2.20 |
| Normal | 1.05 - 3.22 |
| Hard | 1.73 - 4.53 |
| Expert | 2.42 - 6.49 |
| Expert+ | 3.21 - 8.83 |
In general, the rhythm choices across the spread should fit the song. A 200 BPM speed map is going to have a higher note density than a 120 BPM dance map.
Note Jump Speed
There are several terms related to the speed and readability of the map. These terms are all interrelated and are typically influenced by the song's tempo:
- Note Jump Speed (NJS) is the rate at which blocks move down the track at the player. A higher value will make the notes move faster, while a lower value will make the notes move slower.
- Jump Distance (JD, also known as Spawn Distance) is a measure of the physical distance (in meters) that a note will travel to reach the player.
- Half Jump Duration (HJD) is a measure of time (in beats) from when a note spawns to when it reaches the player.
- Start Beat Offset (also known as Spawn Distance Modifier) is a modifier that directly affects the Half Jump Duration which in turns affects Jump Distance. A positive value will make the notes spawn further away from the player, while a negative value will bring the notes closer.
The following video demonstrates the effect of these values in-game:
YouTube | Streamable.
The NJS of your map will affect both the spacing between notes and the timing windows provided for the player. A larger value will make your map more readable at the cost of being more timing-dependent for the player. Aim for the lowest possible value that would ensure a balance between the readability and playability of your map.
Changing the NJS or Offset values will modify the HJD and JD of your map. Community editors will show you how these values change as you make adjustments. Fine-tuned NJS and Offset are a matter of personal taste, so you may need to rely on trial and error to find values that work for you. For lower difficulties, always be wary about putting too many notes on-screen at once based on the values you choose.
The table below provides a range of NJS and JD values from typical community spreads, so you can use these values as a recommended baseline for where your values may lie.
| Difficulty | NJS Ranges | JD Ranges |
|---|---|---|
| Easy | 10-12 | 25-30 |
| Normal | 10-12 | 25-30 |
| Hard | 10-15 | 23-30 |
| Expert | 12-18 | 23-27 |
| Expert+ | 15-23 | 21-27 |
Playtesting
Already mentioned in detail on the Mapping Home Page it's important enough to mention again here:
- Test your own work early and often, especially when you're just starting out!
- If you can't test your own work have a friend play it. Just remember that a friend may be more likely to say "that's awesome, man!" than to give you honest advice and risk hurting your feelings... even if that's what you need.
- Even if you test your own work you can become "map blind" because you know it so well and may not see playability issues
- Use the
#testplayschannel on BSMG wisely. There are experienced mappers who will play your pre-release map and provide constructive feedback. Sometimes there's a LOT of constructive feedback and that's ok. Those experienced mappers were once newbies with terrible maps themselves. If you've read and absorbed the info on this page you will be much better off!
HAPPY MAPPING! Visit #mapping-discussion on the BSMG Discord with questions!
Credits
Content in this section has been derived from guides by Awfulnaut and Hexagonial.