Mediocre Map Assistant 2 User Guide
Essential information to get up and running using Mediocre Map Assistant 2.
NOTE
This guide currently supports both Mediocre Map Assistant 2 by Assistant and Mediocre Mapper Mk5 (final public release) by Squeaksies. All future public development will occur on MMA2.
Prefer video tutorials?
Check out Helen Carnate's 17 minute mapping guide or Fruhead's Beginners Guide to Mapping lecture series.
Remember:
The text guides are always more up to date as it is easier and quicker to change.
Editor Setup
Windows Installation
- Download MMA2.zip from BSMG Git.
- Unzip the file and place the extracted folder wherever you like on your hard drive.
- Double click
mediocremapassistant2.exein the extracted folder to run.
WARNING
It is VERY important to unzip the file in step 2 and only run the exe in the new folder instead of the one inside the zip as not doing so will cause issues with map creation and editing!
First Time Setup
The first time you run MMA2 you will need to direct it to the location of two folders: CustomLevels and CustomWIPLevels. You have several options available to you:
If you have Beat Saber installed on the computer:
- Give MMA2 the path to the two appropriate folders
- Steam Example:
C:\Program Files (x86)\Steam\steamapps\common\Beat Saber\Beat Saber_Data\CustomLevels - Oculus Example:
C:\Program Files\Oculus\Software\Software\hyperbolic-magnetism-beat-saber\Beat Saber_Data\CustomWIPLevels
- Steam Example:
If you have the Quest version -OR- don't have Beat Saber installed on the computer:
- Download
mapping-folders.zipfrom BSMG Git which contains pre-formatted folders that mimics a game install. - Extract the zip to a location of your choice.
- Enter the path to the CustomLevels and CustomWIPLevels folder near the bottom of the Settings Bar.
- Example Path:
C:\Users\bsmg\Documents\Beat Saber\Beat Saber_Data\CustomWIPLevels
- Example Path:
- Alternatively, you can make two folders called
CustomLevelsandCustomWIPLevelsand then provide the path to them.
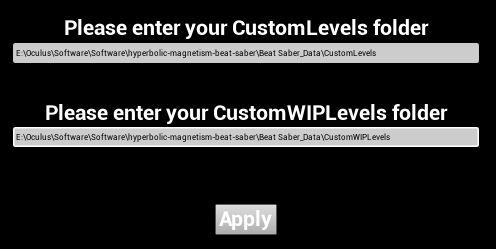
All of your working map files will go into a song name folder within this CustomWIPLevels folder.
Linux Installation
- Download MMA2.zip from BSMG Git.
- Unzip the file and place the extracted folder wherever you like on your hard drive.
- Follow the Proton installation steps for your Linux Distribution.
- Open Steam. At the top of the window, go to
Steam > Settings > Steam Play. In theAdvancedsection, checkEnable Steam Play for all other titlesif it isn't already. Restart Steam if you are prompted to do so. - On the bottom left of Steam's main window, click
Add a Game, thenAdd a Non-Steam Games. A window opens, clickBrowseat the bottom. SelectAll Filesas the file type. Find whereMediocreMapAssistant2.exeis, and add it. - Search for
Protonin the Steam search bar, then install the latest version. - Right-click the
MediocreMapAssistant2.exeshortcut, and open the Properties menu. CheckForce the use of a specific Steam Play compatibility tool, and select the latest version of Proton in the dropdown menu. At this step, you might also want to rename and add an icon to the shortcut as Linux cannot read the built in logo for MMA2. - You can now use MMA2 by starting it through Steam. You can also create a shortcut by right-clicking the MMA2 shortcut in Steam, then under the
Managesection clickingAdd Desktop Shortcut.
Linux First Time Setup
The first time you run MMA2 you will need to direct it to the location of two folders: CustomLevels and CustomWIPLevels. You have several options available to you:
If you have Beat Saber installed on the computer:
- Give MMA2 the path to the two appropriate folders, prefixed by
Z:.- Example:
/home/bsmg/.local/share/Steam/steamapps/common/Beat Saber/Beat Saber_Data/CustomWIPLevelsshould be entered asZ:/home/bsmg/.local/share/Steam/steamapps/common/Beat Saber/Beat Saber_Data/CustomWIPLevels.
- Example:
- To find where Beat Saber is installed, right-click Beat Saber in Steam, go to
Manage > Browse Local Files. - The folders should be located under the
Beat Saber_Datadirectory.
If you have the Quest version -OR- don't have Beat Saber installed on the computer:
- Make two folders called
CustomLevelsandCustomWIPLevelsand then provide the path to them. Note that the usual Linux paths need to be prefixed withZ:.- Example:
/home/bsmg/MMA2/CustomLevelsand/home/bsmg/MMA2/CustomWIPLevelsshould be entered asZ:/home/bsmg/MMA2/CustomLevelsandZ:/home/bsmg/MMA2/CustomWIPLevels
- Example:
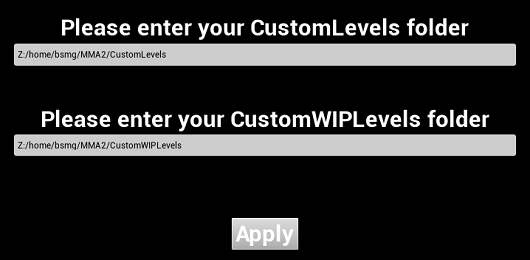
All of your working map files will go into a song name folder within this CustomWIPLevels folder.
Check the WIP File Path
The path given from setup may not carry over from the main screen. Make sure the fields have the paths from your setup and are not blank. If blank, add the path(s) from First Time Setup and press Enter to confirm!
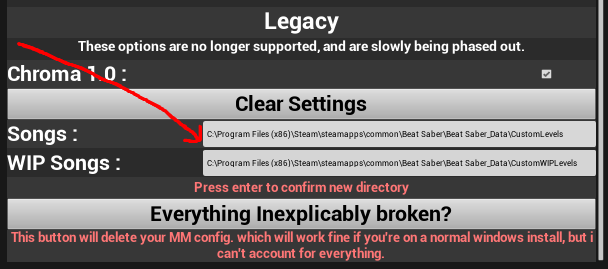
Editor Settings
Once you've set up your paths, these core settings are all available from the song selection page when you first open the program.
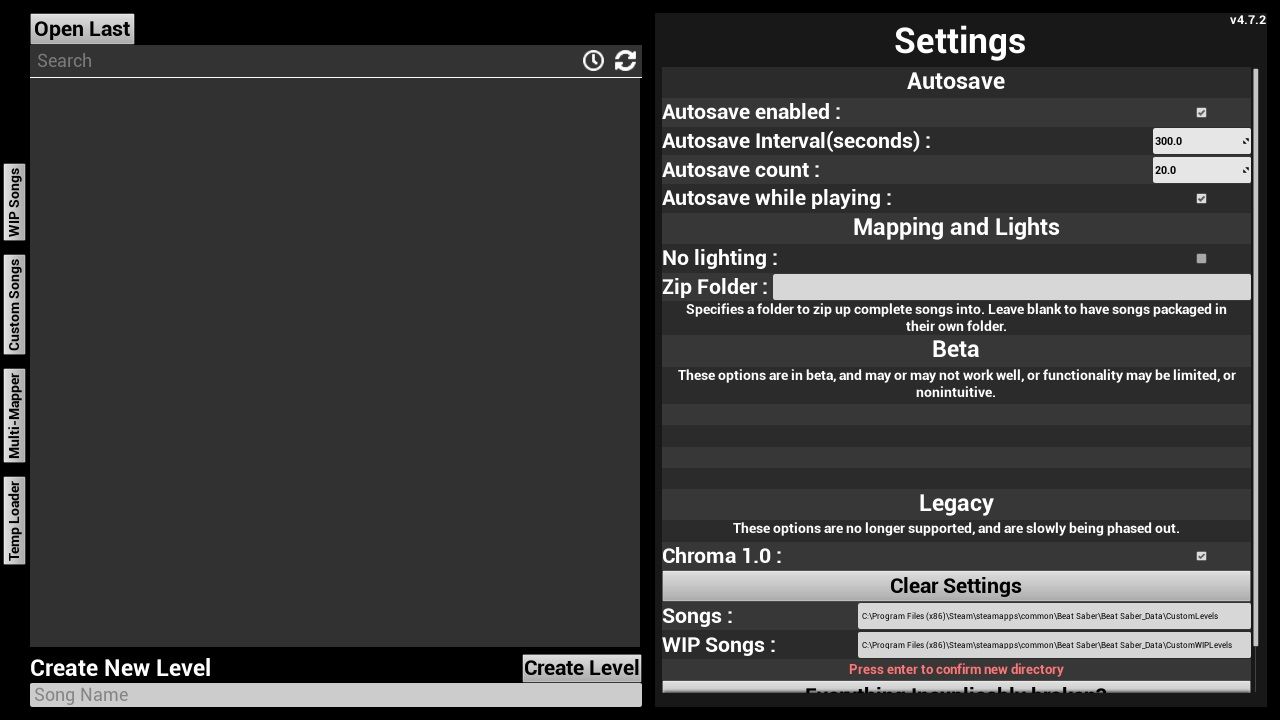
Map Selection
The map selection pane has four tabs, each with songs listed alphabetically.
- WIP Songs: This tab contains all of the map folders saved in your
CustomWIPLevelsfolder. New maps are created here and are accessible in-game under "Custom WIP Levels." - Custom Songs: This tab contains all the downloaded custom songs saved in your
CustomLevelsfolder. Maps are accessible in-game under "Custom Levels." - Multi-Mapper: This tab contains any maps being collboratively worked on via the Mediocre Mapper Server.
- Temp Loader: This tab allows you to temporarily "quick preview" zip files online (i.e., from #testplays, BeatSaver, or BeastSaber) without downloading and extracting them.
There are several functions available to you on this screen:
- The Refresh Song List button refreshes the songs listed.
- The Edit button next to a map opens it in MMA2.
- The Delete button next to a map perma-deletes it. Note: Once deleted this way maps are gone forever and unrecoverable.
- The Star button next to a map favorites it, bumping it to the top of the list.
DANGER
Maps deleted by the delete button in MMA2 are not sent to the Recycle Bin and are permanently removed.
This includes the autosaves folder. Please be certain and/or keep backups of your work in a separate location.
Map Creation
Below the map selection pane you can create a new empty song folder in CustomWIPLevels by entering the desired name of your folder (typically Song Name or Artist - Song Name) then clicking Create Level.
Settings
The settings pane includes global settings for autosaving, zip packaging, folder paths, and more.
- Autosave Settings: Autosave is enabled by default at an interval of 300 seconds (5 minutes). This is generally fine for most users unless you are doing a light-heavy map. Autosave while playing the song in the editor is also enabled by default.
- Mapping & Lighting Settings:
- No lighting is off by default, meaning that any lighting events placed on the lighting track will play. Check to prevent lights from playing while mapping.
- You have the option to provide MMA2 with an alternate folder to save your packaged songs. By default the packaged song will be found in the same folder where the uncompressed map lives.
- Beta Settings: If you have the Mapping Extensions mod installed you will have additional checkboxes enabled for "extended" mapping features like precision placement, precision rotation, and six-lane. New mappers are encouraged to skip this until they're more comfortable with the basics.
- Legacy Settings: If you have the Chroma mod installed you can check this box to enable the Chroma lighting toolbar but it has been unsupported for some time.
- Other Settings: Click the Clear Settings button to revert to default settings. You may also enter new paths for either of your song folders. If for some reason nothing works you can click the Everything Inexplicably Broken? button to delete your config file.
WARNING
Confirm both folder paths are complete on the Song Selection screen and add the path(s) from First Time Setup if blank. There is a known bug that deletes the CustomWIPLevels folder path on first use.
Song Setup
Once you've finished one-time editor setup you're ready to create your first map.
Song Creation
You have two options to create your song folder:
- Enter your desired folder name in the 'Create New Level' pane and click Create Level. Your new folder will automatically appear in your map list.

- Navigate to your
CustomWIPLevelsfolder and make a folder with your desired folder name. You will need to click Refresh Song List to see your folder.
Click Edit to enter your song information and metadata.
Song Info Settings
The Song Info page is the first screen you see every time you edit a map.
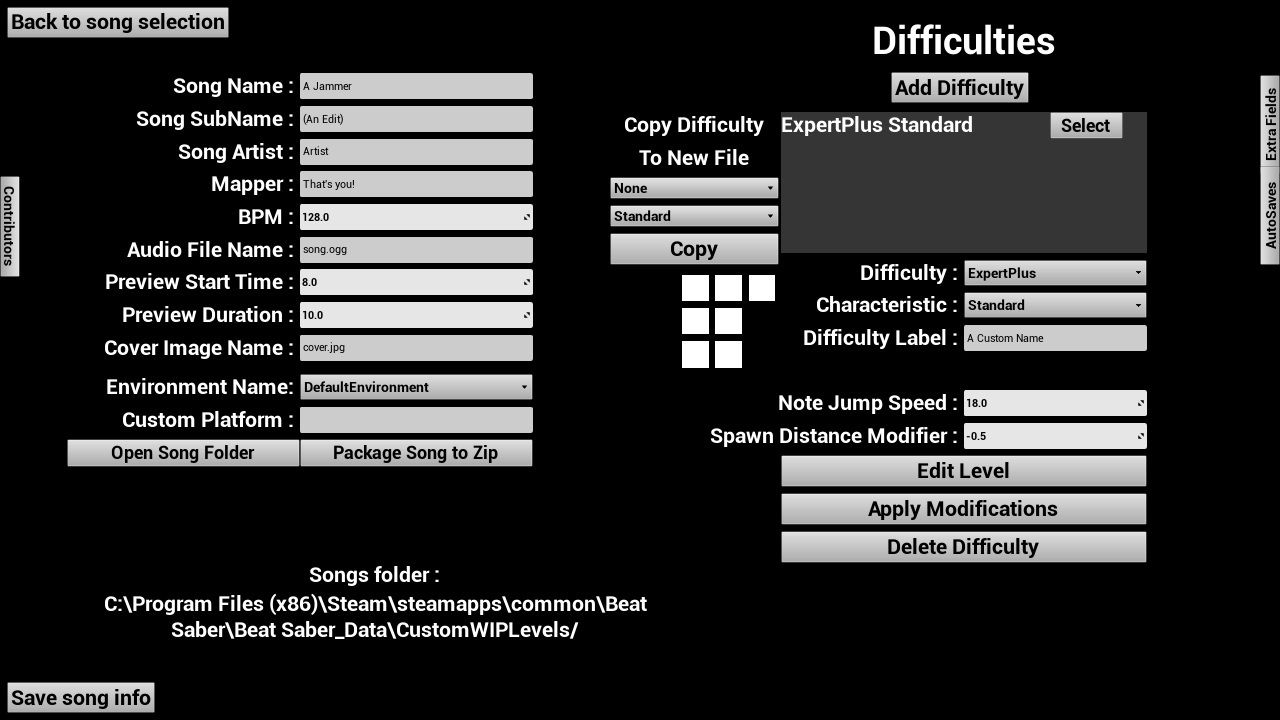
Whole Map Settings
On the left side of the Song Info page is information that applies to your whole map. See Beat Saber Metadata Criteria for standards on presenting complex song names and multiple artists.
WARNING
Special characters such as those found in, Japanese (日本語/にほんご), Kaomoji (٩(◕‿◕。)۶), Chinese (汉语/漢語), Arabic (اَلْعَرَبِيَّةُ), and accented characters (Ä/é/õ/Æ/ø/ß/Œ/Ð/ƒ) are not fully supported by BeatSaver. Using these characters in song metadata or in bookmarks will cause problems.
- Song Name: The primary name of the song
- Song SubName: Any following tags like (Short Ver.), (SDVX Mix), etc.
- Song Artist: The person or group who authored the song
- Mapper: This is YOU! It's recommended you list your name the same as your BeatSaver user name
- BPM: The tempo of the song. It's critical to get this right before you start. See Basic Audio Setup for guidance
- Audio File Name: The name of the song file (including the extension) you have placed in
CustomWIPLevels > [Song Folder]. Recommended to just name it song.ogg to avoid the pitfalls of special characters - Preview Start Time: Position in the song file, in seconds, of the start of the in-game menu song preview. Defaults to 12s
- Preview Duration: Duration, in seconds, of the in-game menu song preview. Defaults to 10s
- Cover Image Name: The name of the image file (including the extension) you have placed in
CustomWIPLevels > [Song Folder]. Must be perfectly square and at least 256 px - Environment Name: A dropdown menu of the default environments or platforms available. See Basic Lighting Practices for an overview of these environments
- Custom Platform: The copy/pasted name of a custom platform from ModelSaber. This feature is glitchy and it's recommended that you JSON edit any custom platform information
The Open Song Folder button will open your song folder in Windows Explorer. This will help you confirm that you have your files in the right spot. The Package Song to Zip button will remove your autosaves folder and zip the files for BeatSaver. The Save Song Info button commits all of your metadata to the Info.dat file
Difficulty Settings
On the right side of the Song Info page is the area where you create individual difficulties and edit data that only applies to a single diffculty level.
To create your first difficulty:
- Click the Add Difficulty button.
- In the Difficulty dropdown select which difficulty you want to make (easy, normal, hard, expert, or expertplus).
- In the Characteristic dropdown you can select Standard, No Arrows, or Single Saber.
- Difficulty Label is optional and allows you to give your difficulties custom names in-game. If left blank, the difficulty set in the dropdown will be displayed instead. This feature may not reliably work on all VR models.
- The Note Jump Speed field is where you change the speed at which the notes move down the track. Click into the field for a pop-up of helpful information. See Basic Mapping Practices for guidance on setting an appropriate NJS for your difficulty.
- The Spawn Distance Modifier field allows you to adjust how far down the track your blocks appear. Changing this value will adjust the "jump distance" guidance pop-up.
TIP
You must click Apply Modifications if you make a change to difficulty settings, otherwise it will not be saved. In MMA2 this appears to automatically happen when you enter a song file for editing.
Click Edit Level when you're ready to start mapping!
Color Override Settings
You can set the environment color overrides for the selected difficulty using the squares on the right side of the Song Info page. Hovering over a square will list what override the square is for. Clicking on the square will bring up the color picker. Right clicking on the square will remove the overridden color (returning back to the default color).
colorLeftandcolorRight: Color of the left and right hand blocksobstacleColor: Color of the wallsenvColorLeftandenvColorRight: First pair of lighting colorsenvColorLeftBoostandenvColorRightBoost: Second pair of lighting colors
Other Settings
- Contributors Tab: This left side tab is an optional spot to give credit to mappers, lighters, playtesters or other contributors to your map. Enter the contributor role, their name, and the file name of a square "profile image" which you place in your song folder.
- Extra Fields: This right side tab allows you to include in-game viewable warnings (i.e, Seizure Alert), information, suggestions (i.e. Use Chroma), and requirements (i.e., Mapping Extensions)
- Autosaves: This right side tab allows you to easily restore an autosaved version of your map if you've crashed or need to revert work.
Mapping Settings
Mapping settings can be accessed by clicking the hamburger menu in the top right while editing the map. It can also be toggled using the ESC key. These settings persist throughout your mapping session but will be reset the next time you open the editor. The Mapping Settings pane also includes a comprehensive list of keybindings.
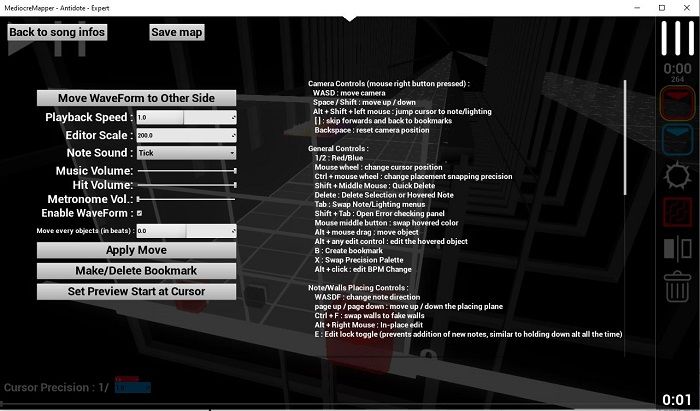
- Move WaveForm to Other Side: This button will shift the wave form from the left of the mapping track to the left of the lighting track. Useful during the lighting process.
- Playback Speed: Will slow down the map and song in the editor. Decimal values representing pecentage (i.e., 1.0 = 100% speed). This feature is helpful when timing particularly gnarly sections of a map.
- Editor Scale: Adjusts the spacing of the beat markers on the map to help with visibility. Increase the number to spread notes or lighting events out more for easier placement.
- Note Sound: Allows you to select from several in-editor hit sounds to help with timing. Select
Noneto turn off hit sounds in the editor. This does not impact hit sounds in-game. - Music Volume: Adjusts the volume of the song in the editor only. 100% by default.
- Hit Volume: Adjusts the volume of the hit sounds in the editor only. 100% by default.
- Metronome Volume: Adjusts the volume of an in-editor metronome. 0% (off) by default.
- Enable WaveForm: Toggles the wave form visualizer on and off. The wave form is incredibly helpful for timing but it very resource intensive on your CPU.
- Move Every Object (in beats): Allows you enter a decimal value in beats, positive or negative, to shift ALL objects that number of beats up or down the track. Helps you fix hot starts if you didn't correctly set up your audio file.
- Apply Move: This button will commit the note movement specified above.
- Make/Delete Bookmark: This button will add a bookmark at the current cursor placement if one doesn't exist (add a name and hit enter to save) or will delete an existing bookmark.
- Set Preview Start at Cursor: This button allows you to quickly reset the beginning of your in-game music preview at the cursor location.
Editor Controls
There are usually multiple ways to accomplish the same action, however the keyboard shortcuts at the link below are the most efficient.
The Mapping Settings menu has a comprehensive list of keybindings. You can also check out the Editor Keybinds page.
Error Checker
The Error Checker functionality is one of the top quality of life features found in MMA2. Access the error checker by clicking SHIFT+TAB to check for vision blocks, double directionals, stacked notes, and view map stats.
Finding & Interpreting Errors
This section walks you through basic usage of the error checker's primary functions: Check for Double Directionals, Check for Vision Blocks, and Check for Stacked Notes
Navigating the Error Checker
Here is the main panel for the Error Checker:
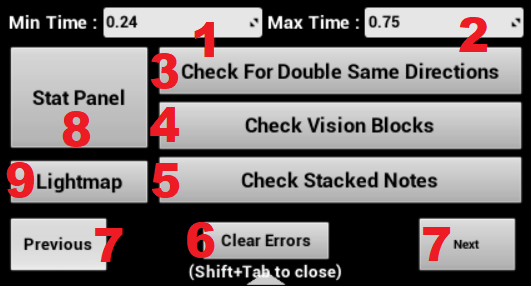
- Minimum Time: The minimum amount of time in beats that will be checked. Leave it alone.
- Maximum Time: The maximum amount of time in beats that will be checked. You'll need to adjust this based on both the BPM and NJS (Note Jump Speed) of your song/level. 1.5 beats is the minimum recommended for new mappers.
- Double-Directional Checker: Highlights any instances of a block of the same color pointing in the same direction within the number of beats specified in Maximum Time.
- Vision Block Checker: Highlights any instances of blocks or walls obscuring or hiding a block within the number of beats specified in Maximum Time.
- Stacked Block Checker: Highlights any instances where multiple blocks are stacked on top of each other.
- Clear Errors: Clears highlighting from all error blocks. They're still errors, just not marked.
- Previous/Next: Jumps you backwards or forwards through your map to each highlighted error.
- Stat Panel: A wondrous box of delicious statistical information that can help you ensure that your map is leveled appropriately and follows row placement best practices.
- Lightmap Integration: Not part of error checking, and not covered in this guide, but this is how you can add fast (but terrible) lights.
Highlighted Errors
Once you click Check for {error of your choice} pay attention to the bottom center of your screen. Red text will pop up that tells you how many errors were found within the specified number of beats:

- Only one error can be highlighted at a time.
- Clicking one error button immediately after the other will wipe out the error highlights and replace them with the next type.
- Use the previous and next buttons to jump from error to error to resolve them.
For Double-Directionals: The highlighted block is the second instance of a same color-same direction, so look back in time to see the first block in the sequence. You can change either the first instance or the second instance to correct the error. Once you've made your change you can click "Check for Double Directionals" again to see if the issue is resolved. You can change the max time value to suit the speed of your song. 2.0 beats is a good baseline for new mappers but the faster the song the more beats you may need for a reasonable reset (if that is your intention).
| Example | Explanation |
|---|---|
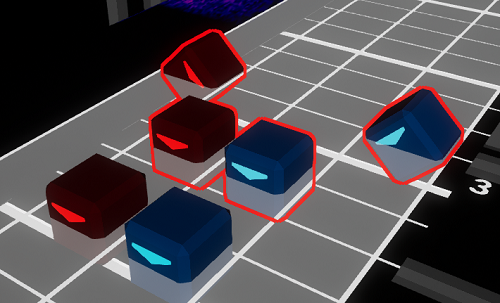 | In this example, max time is set to 0.75 beats. There is a set of down notes 1/2 beat apart and then a set of diagonal notes 1/2 beat after that. The first set of blocks isn't flagged but the next two are because they are double directionals within 3/4 (0.75) of a beat after the first set. You have two options: Change one of the blocks Force the player to "reset" (return their arms/hands to a neutral position) if there's enough time. |
TIP
Keep clicking the "Check for Double Directionals" button... sometimes fixing one error can create a new error out of your line of sight. Check early and often!
For Vision Blocks: The highlighted block is being obscured by the blocks immediately in front of it within the specified distance. This guide won't get into details on vision blocks but mappers should be very selective when placing any blocks in the center two positions as those are at eye-height for the player in-game and are not-so-affectionately referred to as "facenotes." Blocks in other positions can be vision blocks as well but the two center positions are the most likely culprits. Depending on your BPM, 1-2 beats is fine.
| Example | Explanation |
|---|---|
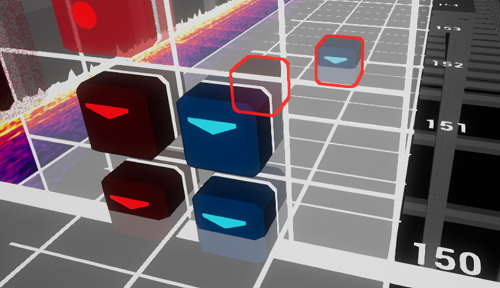 | In this example, I have my max beats set to 2 beats At beat 150 there are facenotes blocking everything behind them. At beats 151 and 151.5 there are highlighted red and blue blocks indicating that the previous blocks are a problem. You have two options: Move/delete the top two blocks (removing the vision block) Move the back two blocks further out in time so the player has a chance to react to them |
Stats Panel
When you're ready, click the Stat Panel button to open an incredibly helpful information window. You can get information by hovering over each title.
TIP
- Use CTRL+scroll to select a section you want to check the stats for, hit SHIFT+TAB and click the Stats Panel button to see values for that section only.
- Hover over the NPS value to see the difficulty ranges for OST 1 tracks. Consult the Beat Saber Map Analysis tracker for the latest (and greatly increased) NPS ranges of all base game maps.
| Example | Explanation |
|---|---|
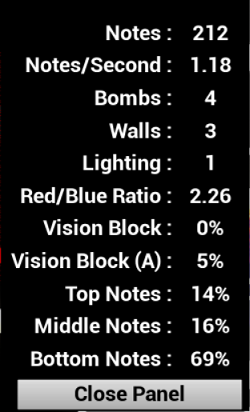 | Notes: The total number of notes in your map. Notes per Second: The number of notes in your map divided by the number of seconds in your map. This number isn't accurate until you've finished mapping, unless you've only selected a small section. Bombs, Walls, and Lighting: The number of each event you have in your map. R/B Ratio: If you have exactly the same number of red and blue blocks this will be 1.00. Greater than 1 you have more reds. Less than 1 you have more blues. Vision Block: The percentage of your map's blocks that are vision blocks at 0.75 beats. Use the vision block checker to highlight these blocks. Vision Block (A): The percentage of your map's blocks that are vision blocks at 1.25 beats. Useful for faster songs. Use the vision block checker with a max time of 1.25 to highlight these blocks. Top/Middle/Bottom Notes: The percentage of your blocks that are placed in each row. |
Troubleshooting
Create Level button does nothing even if a song name is entered
- Check both folder paths are complete on the Song Selection screen and add the path(s) from First Time Setup if blank. There is a known bug that deletes the CustomWIPLevels folder path on first use.
- Make sure the Song Name field below the button is not blank/has text.
- Make sure you are launching the editor from the extracted folder, not the zip (MMA2.zip) you downloaded.
My song is stuck loading in the editor forever or returns to the edit song screen after briefly loading
- This error is usually caused by a missing, corrupted, or invalid audio file. Re-read Basic Audio Setup to ensure you've exported everything correctly and make sure that your file is in the correct folder. Usage of convert to OGG websites is the common cause of this issue.
- The audio file is not in the correct location. Make sure it is in the folder that MMA2 created for your song!
- The folder you should put the
.oggsong file is located to the path you put during First Time Setup and should contain at least anInfo.datfile.
- The folder you should put the
- Make sure you are launching the editor from the extracted folder, not the zip (MMA2.zip) you downloaded.
I can't figure out how to place dot notes
- Press
F- You can review the keybindings by pressing ESC for the in-editor list or consult the cross-reference list of Editor Keybinds.
Map doesn't load in game
- This error is caused by incorrect information in the
Info.dat.- A difficulty's
"_beatmapFilename"in theInfo.datmight be using a different file name than what is present in the folder. - A deleted difficulty is still being referenced in your
Info.datfile.- Check to make sure you do not have unintended difficulties in the
"_difficultyBeatmaps"cluster of each present characteristc.
- Check to make sure you do not have unintended difficulties in the
- A difficulty's
One Saber maps don't load in game
- Update to the latest MMA2 on the BSMG Git then open the map song info settings and press
Save song info.
No Arrows maps don't load in game
- Update to the latest MMA2 on the BSMG Git then open the map song info settings and press
Save song info.
90/360 maps don't use the Glass Desert Environment
- Open the map's Info.dat in a text editor and add
"_allDirectionsEnvironmentName": "GlassDesertEnvironment",after"_environmentName": "DefaultEnvironment",or similar if you set a different environment for other difficulties.
TIP
If you are not comfortable editing the Info.dat, you can zip up your map and use Schema Fixer by +1 Rabbit to make the one time adjustment!
Your audio file name is wrong. Enter only the name NOT the path.
You might have unintentionally named your audio file
song.ogg.ogg. Turn on file extensions in file explorer to make sure it is namedsong.ogg. The option is located here:
Check both folder paths are complete on the Song Selection screen and add the path(s) from First Time Setup if blank. There is a known bug that deletes the CustomWIPLevels folder path on first use.
Your audio file name contains extra periods
.- For example
Sick Beats feat. CMB (Nightcore Ver.).oggwill cause this issue due to the.after "feat" and "Ver".- To prevent this in the future, it is easier to name your audio files
song.ogg. - You can also rename the audio file removing the extra
.for example,Sick Beats feat CMB (Nightcore Ver).ogg
- To prevent this in the future, it is easier to name your audio files
- For example
Your audio file may be invalid. This is commonly caused by websites that promise to "convert to OGG" but do not do it properly. Review Basic Audio Setup to ensure you've exported everything correctly and that your file is in the correct folder.
When I open the editor, all I see is a grid and block and can't interact with it
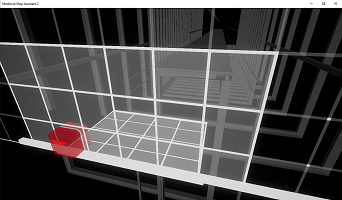
- Navigate to your
\AppData\Localand delete theMediocreMapAssistant2folder. Then runmediocremapassistant2.exeand follow First Time Setup again.- You can copy and paste this path into the file explorer address bar to quickly get to the folder:
C:\Users\%username%\AppData\Local\MediocreMapAssistant2
- You can copy and paste this path into the file explorer address bar to quickly get to the folder:
When I open the editor, it crashes with a Error: The following component(s) are required to run this program: DirectX Runtime
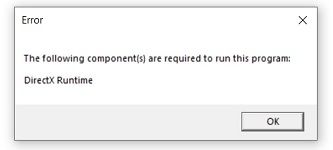
- If your error matches what is shown in the picture. Close out of the dialog and install this Unreal Engine 4 Prerequisite Package.
- If you get this error while installing the driver.
- Download and run the .NET Framework Repair Tool.
- Restart your computer and rerun the DirectX driver installer.
- If you get this error while installing the driver.
When I open the editor, it crashes with a LowLevelFatalError: [Line XX] Failed to load module
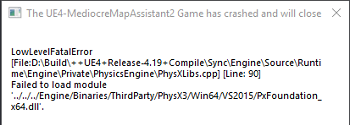
- If your error matches what is shown in the picture. Close out of the dialog and install this DirectX driver.
- If you get this error while installing the driver.
- Download and run the .NET Framework Repair Tool.
- Restart your computer and rerun the DirectX driver installer.
- If you get this error while installing the driver.
When I open MMA2, it works fine for about a minute and then crashes with no error
- After you launch MMA2, disconnect from the internet and wait a couple minutes before reconnecting.
Credits
Content in this section was authored by Helen Carnate, Bloodcloak, and Gabmiral.