Advanced Audio Editing
Dive deeper into audio editing.
On this page you will find additional guides and resources for better understanding audio or more advanced techniques of editing audio.
Checking Audio Quality
Generally, as a rule, always use WAV(E) or FLAC (lossless uncompressed or compressed) files as sources for your songs This is because lossy formats like MP3, AAC or OGG always lose information when converted to their formats and cannot be restored by 'un-converting'. This is why you should never use your exported OGG-file to make new edits to your audio. Therefore, always use a lossless source file, if possible. However, some FLAC sources could be 'up-converted' from lossy formats, so using a spectral analyser tool to check your audio file(s) before using them is a recommended practice. For more information on audio formats this article is recommended.
TIP
Save your own lossless WAV(E) files when doing edits, at each step, so you always have a lossless source to continue editing from without having to redo everything from the start.
The best way to check for source quality and quality loss is using Spek, a free acoustic spectrum analyser tool:
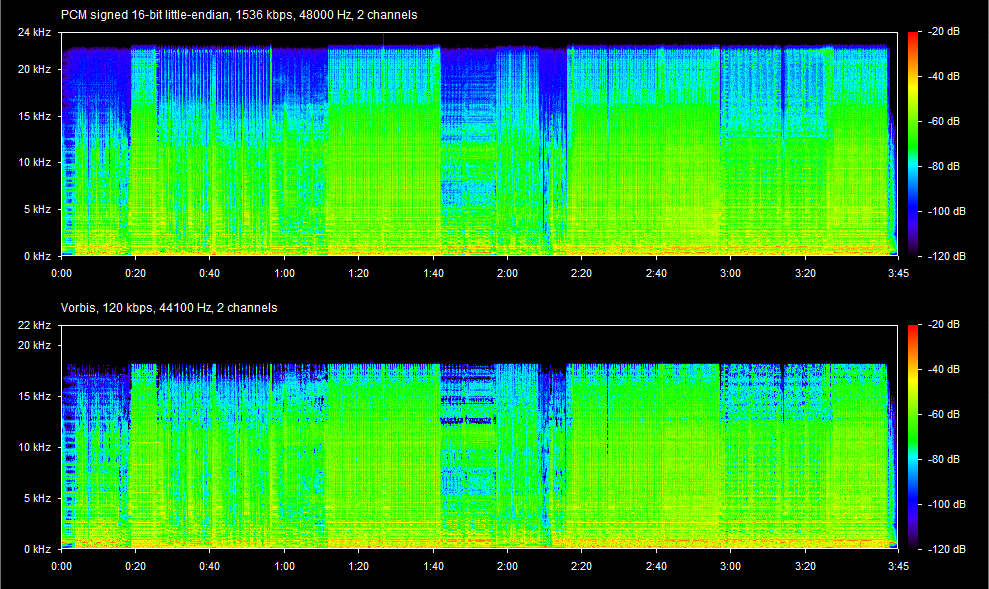
This tool shows the time of the song from left to right, the frequencies from lowest at the bottom to highest at the top and the loudness of the frequencies in color (legend to the right). This screenshot shows the same song with the top graph being a WAVE file and the bottom graph being an OGG file export of the same WAVE file.
How to spot low quality:
- The biggest difference between the two graphs is the frequency cut off at the top of the graph of the lossy format. This is a common technique for lossy formats to save on data as these high frequencies aren't as important for the overall sound reproduction. This is also because the human hearing range, which spans from 20hz to 20khz at birth, can be affected by noise-induced hearing loss and/or age which leads some people to lose hearing in frequencies above 15khz gradually with time. So it saves data by not using these freqencies, something an unaware listener wouldn't notice anyway.
- More importantly, if you look more closely at the frequencies in the audible spectrum (20hz to 20khz) you can see that the top graph looks a lot smoother with good gradients and dark blue areas (faint sounds) compared to the bottom graph which is more jagged and doesn't include much of the finer gradients, most faint blue areas are black here instead.
These two characteristics are what you can look for this when analysing your source sound files. For more info on spectrum analysis this article is recommended.
To use this tool simply open Spek.exe then drag and drop the audio file from file explorer into the Spek window. You can resize the window for more detail in the graph.
Choosing Appropriate OGG Export Quality
You should aim at preserving most of the source audio data while still having the smallest file size. Keep OGG file size under 14MB (for BeatSaver) or 7MB (for Discord without Nitro).
To know what level is ideal for your song you can export your track with different qualities and compare the spectrals. However, as a general recommendation follow these settings:
- High quality source (WAVE, FLAC or MP3/AAC@+200kbps): choose an OGG quality level between 9 to 6.
- Low quality source (MP3 / AAC / OGG): choose an OGG quality level between 5 to 3.
You can't increase audio quality by saving a lossy track with a higher bitrate (e.g. saving a YouTube-sourced track with level 10 quality), you will only bloat the file size. As explained in the previous chapter, information is lost when transcoding to any lossy format and thus can't be restored. Transcoding one lossless format to another lossless format is fine though, e.g. FLAC to WAV(E).
Explaining Audio Processing
To work with audio and do processing of the soundwaves there are several tools available to help achieve what we want or need. Two of these tools used are Compressor and Limiter which we used for volume processing in Volume Modification: Making Your Song Louder.
Below these tools are explained in more detail:
Compressor
In essence, a Compressor reduces the dynamics above a certain threshold, ultimately making the audio signal less dynamic and lower in volume. When also boosting the signal after a compressor (Make Up Gain/Normalize) you can make the sound be perceived even louder.
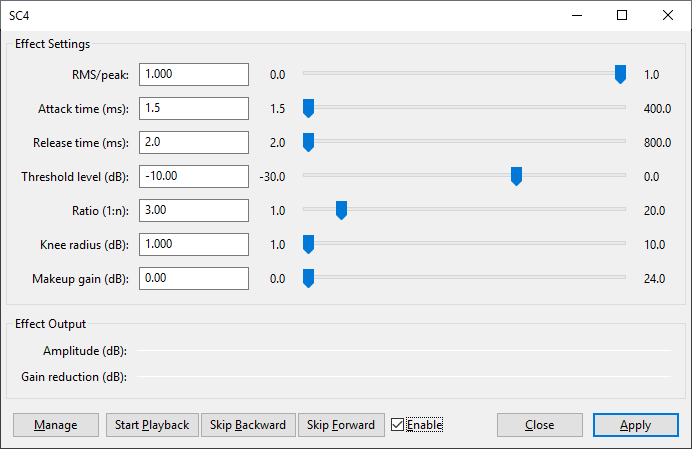
The Compressor effect shipped with Audacity is actually not the best tool for music mastering because it is made for more speech oriented audio. However, it is very simple to use which is why it is used in Volume Modification: Compression and basic settings are provided that work for most cases. However, if you're reading this you either noticed an unpleasant distortion in the sound (the sound cuts out a bit after loud peaks) or you're curious about the settings you can adjust in a compressor, so let's take a look at those settings using the more advanced SC4 plug-in for Audacity (you may need to install the LADSPA bundle to get access to this tool).
| Effect | Description |
|---|---|
| RMS/peak | Somewhat unique to this particular plug-in, you can think of it as an aggressivness slider. For our purpose we want it set to Peak, 1.0. |
| Attack time (ms) | How soon the compressor starts to compress the dynamics after the threshold is exceeded, in milliseconds. To make the compressor as transparent as possible setting it to 1.5 ms is recommended. |
| Release time (ms) | How soon the compressor starts to release the volume level back to normal after the level drops below the threshold, in milliseconds. To make the compressor as transparent as possible setting it to 2.0 ms is recommended. This setting is one reason the Compressor effect shipped with Audacity isn't optimal as it only allows Release times of at most 1 second (1000 ms). |
| Threshold level (dB) | The level at which the compressor will start to apply. This is the value to adjust if you need less or more compression. |
| Ratio (1:n) | The gain reduction ratio used when the signal level exceeds the threshold level. A good starting point is 1:3. Turn this up to have an even more aggressive reduction. |
| Knee radius (dB) | The distance from the threshold where the knee curve starts. Setting this to 1 dB or less should be sufficient. |
| Makeup gain (dB) | The amount of gain added to the processed result. Compared to the Compressor effect shipped with Audacity there is no Make-up gain to 0dB after compressing setting in this plug-in. However, you can easily set this to 0dB and then apply a Normalize effect to 0dB to the whole song and it will do the exact same processing. |
| Enable | A handy feature with this plug-in is the Enable tickbox. It will let you play back the audio with the effect window open and adjust the settings in real time. Tick and untick the Enable tickbox to switch between processed and unprocessed sound at any time while playing the song. This way you can compare your changes audibly right away. |
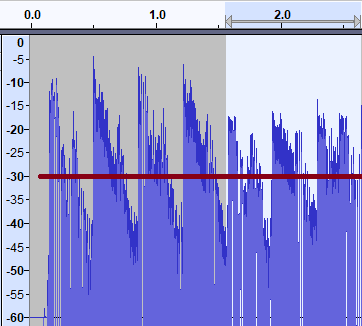
An example of how compression affects the audio, highlighted part has been compressed at 1:3 ratio with a threshold at -30db (red line).
TIP
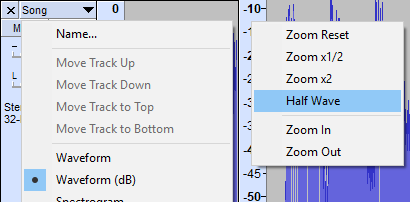
To make it easier to visually judge the dynamics of the song in dB you can set the threshold at do the following:
- Left-click the track label and choose
Waveform (dB). This will show a logarithmic waveform with dB in the scale instead of a linear scale. - To increase the scale right click the scale on the left of the tack and click
Half Wave. - To maximize track height go to
View -> Track Size -> Fit to Heightor simply pressCtrl + Shift + F. This will show more of the scale.
More in-depth information about compressors can be found here.
Limiter
A limiter is in essence a compressor effect with an infinite gain reduction ratio, terminating any signal from going above the threshold. It means a Limiter is useful for cutting off the peaks of a waveform and making the audio be perceived even louder.
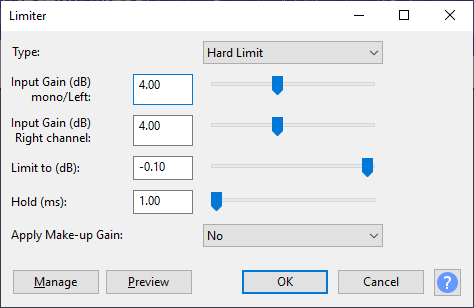
Let's take a look at Audacity's Limiter effect:
| Effect | Description |
|---|---|
| Type | How the effect should apply the limiting effect. For our purpose we want Hard Limit. |
| Input Gain (dB) mono/Left/Right channel | This is by how much you want to boost the audio volume by. Essentially the same as the Amplify effect. Have the same value for both left and right or you will skew the stereo image. This is the value you adjust if you need a louder or softer effect. |
| Limit to (dB) | At which volume the effect will limit the signal. This can be set at 0dB and will thus prevent distortion clipping, but to give lossy formats some headroom when encoding the best value to use is -0.1dB. |
| Hold (ms) | For how long the limiter effect should last for once engaged. To make the Limiter as transparent as possible setting this to 1ms is best for our purpose. |
| Apply Make-up Gain | Will normalize the peaks to close to 0dB, but we've already set the proper volume with Limit to (dB) so this setting is unnecessary. For our purpose set this to No. |
More in-depth information about limiters can be found here.
Song Editing using Cross-fades
When editing a shorter version of a song and a simple hard immediate cut between two similar sections of a song isn't enough to convince your ears (usually the sections aren't perfectly the same, usually in non-electronic music) then applying a cross-fade between the sections usually helps. Any type of restructuring editing is easier in a DAW software that uses beat grid editing, but it is possible to do the same in the free software of Audacity as well, which we will show here.
For those who don't know, a cross-fade is when one audio track fades out while another simultaneously fades in. For the best results, find identical or near-identical sections on each end of the region you want to cut. Instrumental regions in electronic music are better suited than regions with vocals. Using the smallest segment possible, particularly a small section between two peaks/beats, is better to convince a listener.
There is also a video of this process available here.
To crossfade two sections of a song do the following:
- Open the song in Audacity.
- Duplicate the song track (
Select menu -> All + Edit menu -> Duplicate, or simply pressCtrl+AthenCtrl+D.) - Roughly fill the unwanted end of the first track and unwanted start of the second track with silence (Select, then
Generate menu -> Silence...).

- Align the tracks by using the Time Shift Tool (
) to move the second track to a place roughly in place so the similar sections are close to each other. Then zoom in and adjust again, then repeat till the waveform changes to dots when you zoom. Align the dots on the bottom track with the similar peaks and lows with the top track, if possible.
TIP
Utilize a Click Track to make sure the tracks are in time with each other.
See Audio Preparation: Adding Click Track.

- The last section of the top track should now be identical or similar to the first section of the bottom track but from different times in the song. Listen to the overlapping area to confirm a match, making sure there is no echo/offset from misaligned tracks.
TIP
To avoid overdrive/clipping from two -0db peaking tracks you can set the faders for both tracks to -6db then later back to +0db after the crossfade has been applied. Double click the fader to type in the number.
- Select the overlapping region across both tracks.
- Go to
Effect menu -> Crossfade Tracks. Set Fade direction toAlternating Out / In. Click OK to apply crossfade.
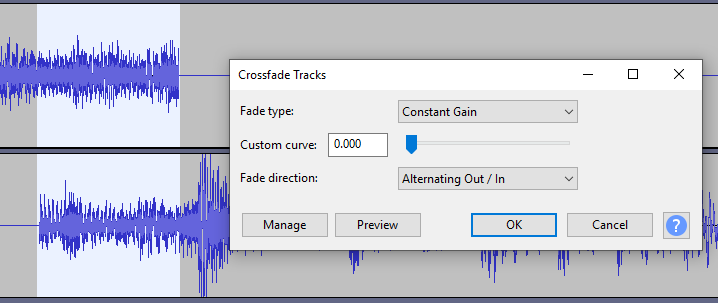
- Listen to the overlapping sections again. If all went well, you should now have a perfectly blended transition between the two tracks.
- Combine the tracks by selecting all (
Select menu -> AllorCtrl+A) then going toTracks menu -> MixthenMix and Render. - Done. You could now proceed with other Audio Editing or finish with Exporting.
Variable BPM
If the song you're trying to map has a tempo that doesn't sync up with a fixed BPM (as in, even with BPM values with decimals), such as (older) acoustic pop, rock or metal songs, they were most likely not recorded to a metronome and will thus not easily sync up to a fixed BPM in Audacity or the map editor. This takes a lot of time and patience, so make sure it's worth the extra effort as some solutions involve brute force by manually adjusting the BPM (tempo track) at intervals, sometimes every beat, to fit the song.
The benefit of having a synced BPM/tempo track is easier and consistent note placement and editing, as well as easier and consistent lighting editing, especially with more than one difficulty in a map.
There are several methods to go about handling variable BPM:
- Time warp the sound into a fixed BPM using DAW software. See Warping with Reaper for info.
- Manually time the BPM changes in MMA2.
- Video tutorial by BennyDaBeast here
NOTE: Benny uses an older editor, Mediocre Mapper, in this tutorial. Some UI elements may have changed in the latest editor, MMA2 but, the rest of the content is great!
- Video tutorial by BennyDaBeast here
- Use DAW software and find all the tempo changes using a tempo track editor. Use Jumps instead of Ramps as that's how MMA2 changes tempo. When you've found all the tempo changes input those into MMA2. (Remember, DAW softwares usually displays measures and beats, but MMA2 only displays beats.)
Warping with Reaper
Reaper is a DAW (Digital Audio Workstation) that has a permanent free trial and is a great alternative to expensive professional software such as Ableton Live. If you have and are comfortable with Ableton, you should use it instead of Reaper.
Here we will be using its warp feature to subtly adjust the audio to a consistent tempo. Reducing the amount of BPM changes you will need to set in editor.
Getting Started
- Download Reaper if you have not already.
- Create a new project.
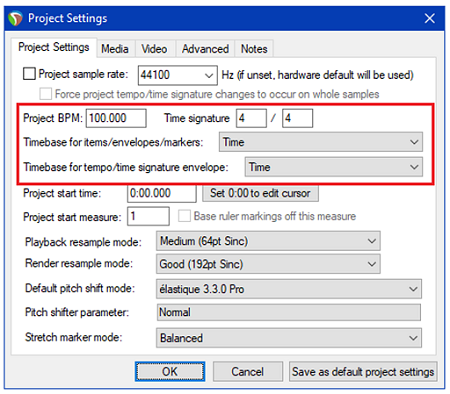
- Setup your project settings.
- File > Project Settings
- Set the initial BPM of the song, and set both Timebase dropdowns to
Timeinstead ofBeats.
DANGER
This is a critical step! You can ruin your audio if you do not set the initial BPM and Timebase settings correctly!
- Turn off Snap To Grid. It's the green magnet icon in the top left corner.
- Add your audio to the project. Insert > Media File, and find your song.
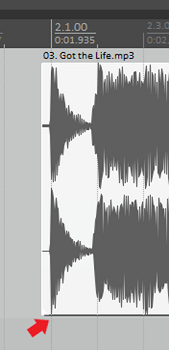
- Drag the whole audio track accordingly to prevent a hot start or too-long of an intro.
- See Basic Audio: Plan Your First Note for more info.
Lining Up Beats
Now the important part. We are going to warp the audio to land perfectly on the BPM we set in the Project Settings.
This process is also demonstrated in this video by TechButterfly
You should notice peaks around where the main drum beats are. On a song with consistent BPM, those peaks will land exactly on the beat markers. For your song, the peaks will eventually drift away from those beat markers.
When they do, you will need to:
- Click on the peak.
- Use Shift + W to add a stretch marker.
- Drag the stretch marker onto the beat line.
| Step 1 | Step 2 | Step 3 |
|---|---|---|
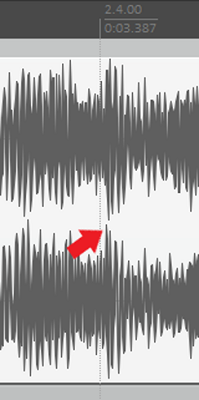 | 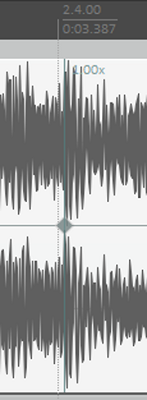 | 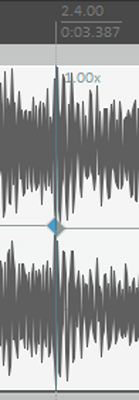 |
Warping your song is simply a matter of repeating this for the whole song. You should start by doing this every 4 beats or so. Most of the time this is good enough to line up the whole song but, keep an eye out for beats in between stretch markers. If they start drifting, use another stretch marker to fix it.
NOTE
Excessive warps could introduce artifacts or significantly alter the song that it is noticeable by listeners/players.
Things to Keep in Mind
There can be many hidden "gochas" when warping a song. Here are some things you might encounter and their possible solutions.
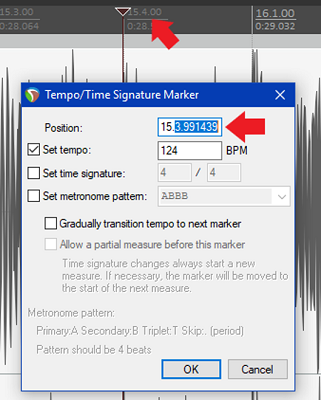
- If you are warping the beats and notice that the drifting becomes larger and larger, you may want a tempo change so that you don't warp the audio as much. This might be caused by a BPM change in the song or some bands not caring about tempo.
- Click where you want the tempo change to begin.
- Shift + C to add a tempo change.
- Edit the position of the change to be exactly on the start of the beat.
- Change the tempo.
- Use trial and error to minimize the amount of drifting over the next chunk of audio.
- You will need to add the same BPM change in the map editor!
Some Peaks can be vague, especially when there are several sounds happening at once. There are a couple of ways to test a peak to find where the drum hit is.
- By dragging the cursor back and forth over the peak, you should hear a thump as you hit the peak.
- If you click just before the peak, then hit spacebar to play the audio, you should instantly hear the drum hit.

Pay attention to how the song is supposed to feel. Not every big drum beat is on a beat marker. For example, some songs have big crash cymbal hits a half or quarter beat before the main beat. You can try finding music tabs or other resources to figure out the intended timing of a song. Just be aware that online tabs are not guaranteed to be accurate in fact, some tabs seen on songsterr are completely made up!
Rendering/Exporting the Audio
Once you are done editing your audio, you will want to render it as a .ogg file that Beat Saber can use.
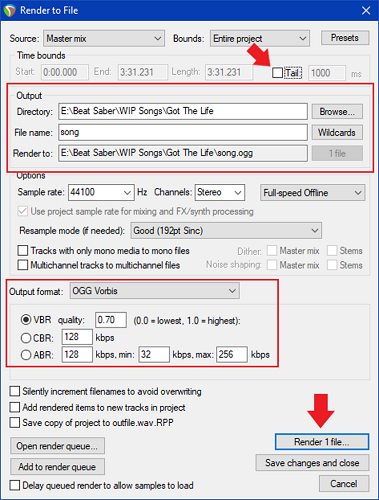
- File > Render
- Uncheck the Tail checkbox unless you want to add silence to the end of the song
- Set up the destination path and file name (without the
.oggextension, as it gets added automatically) - Select OGG Vorbis as the Output Format
- Configure the quality accordingly. Reaper uses a 0 to 1 scale instead of 0 to 10. However, principals outlined in Basic Audio: Exporting still apply.
- High quality source (WAVE / FLAC / MP3 / AAC) use 0.6-0.9 (unless there is a file size issue.)
- Low quality source (YouTube or such): use 0.3-0.5
- Click the Render 1 file button. After some time, you'll have an OGG file with nicely lined up beats!
Credits
Content in this section is derived from guides by Nik, LittleAsi, and Ris who adapted Heisenberg_IRL's method of warping in Ableton. Additional edits by Kolezan.