Basic Audio Setup
Get your audio file set up and ready for mapping.
This page provides both new and experienced mappers with general recommendations for setting up a new song file before starting to map. Review the quick start guide below for steps that are critical before you begin mapping vs. those that can be done at any time, if they're needed.
Audio Setup Quick Start
WARNING
- Steps 1-3 MUST be completed before you start mapping or your audio will be out of sync and may have a hot start.
- Using Online Websites to convert audio to
.oggmay result in your audio file being treated as invalid and will not be loaded by the game! Processing and exporting from Audacity is the easiest way to ensure your audio file works as expected.
- Download and Install Audacity
- Optionally install the ffmpeg for windows addon to open additional file types such as
.aacor.m4afrom iTunes.
- Optionally install the ffmpeg for windows addon to open additional file types such as
- Find the BPM and offset of your song to sync your song
- Export your song as an
.oggformat file
Any time before upload:
4. Check your song volume and make it louder or softer as needed
5. Check the length of your song outro and trim it if needed
Song Selection for New Mappers
Below are recommendations, not requirements, and will help to ease you into mapping. If you want to map 17 minutes of "In A Gadda Da Vida" for your first map then have at it but know that you'll face a lot of additional challenges.
- Choose a song that has a clear beat to map to. Some genres work better than others.
- Choose a song with a consistent tempo (for example songs with electronic drums). Songs that have tempo/BPM changes over time can be very complicated to map.
- Choose a song on the shorter side (less than 3 minutes is better). Mapping a 10-minute epic to start with may lead to frustration and/or burn out.
- Finally, choose a song that you don't mind listening to over and over and over and over again. But avoid mapping your favorite song as your first few maps, save that for when you're more experienced.
Audio Quality
Before you begin mapping, ensure you have a high quality source file for your song. Many maps have terrible audio files, often from YouTube rips or low bitrate files. This is a game for music after all, so having good audio is essential for a good player experience.
Follow these general guidelines as you work on your maps:
- Use the highest quality source you can find such as FLAC or WAV(E) files (lossless format).
- A close second are high bitrate (+200kbps) MP3 or AAC files (lossy formats).
- Use a YouTube rip only as a last resort. The bitrate is low and the volume is seldom right. In this case some audio editing might be required (see Optional Audio Editing).
Sites where you can buy the tracks/album, such as an artist's Bandcamp or on HDTracks, will usually have the highest quality source available. If the song is not available on those sites, Google Play Music, Amazon Music, and iTunes are alternatives for high quality MP3 files.
By purchasing and using a high quality audio file, not only are you supporting your artist, but you save yourself a lot of headache while mapping. Look at the difference in quality for the same song, at the same beat.
| OGG Quality | YouTube Rip | MP3 | WAV | FLAC |
|---|---|---|---|---|
| 1 | 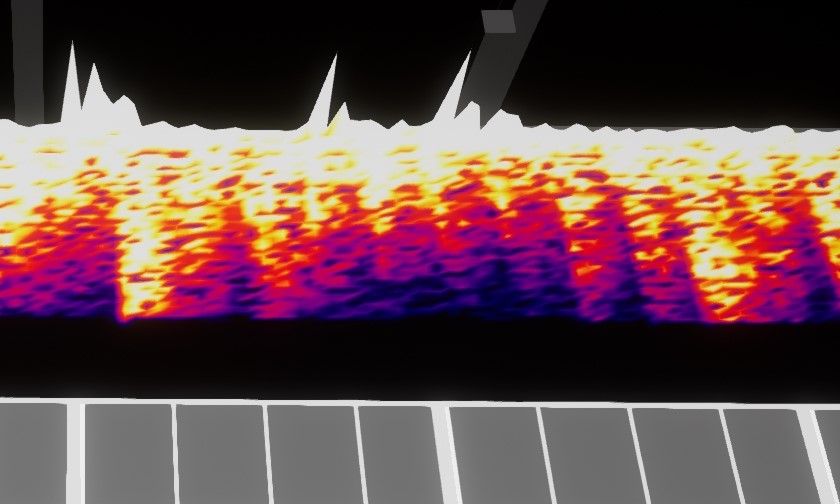 | 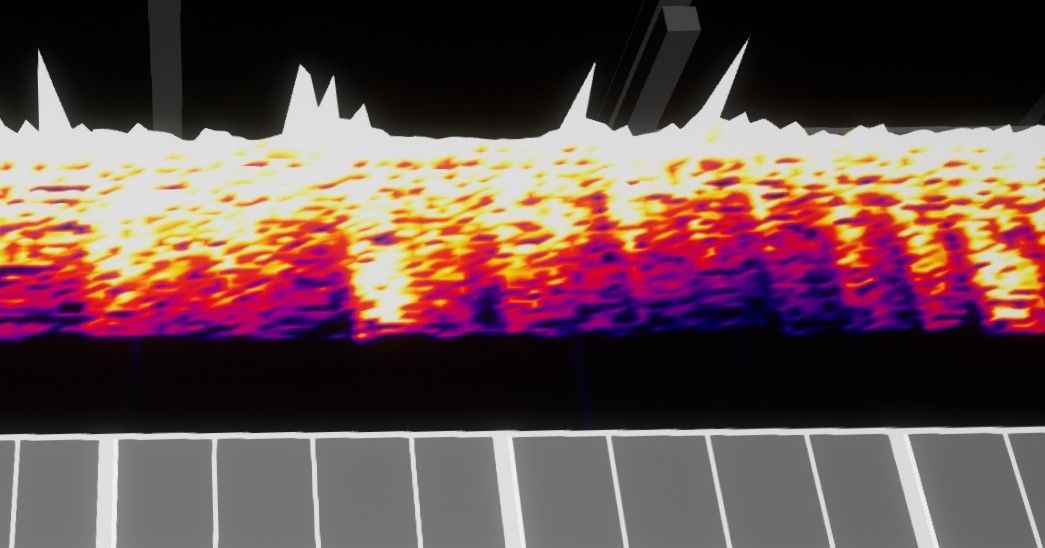 | 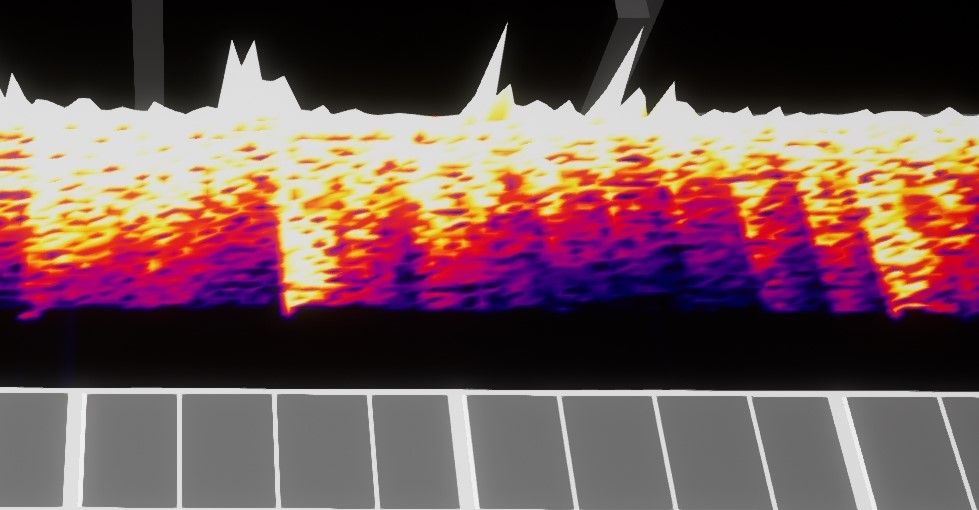 | 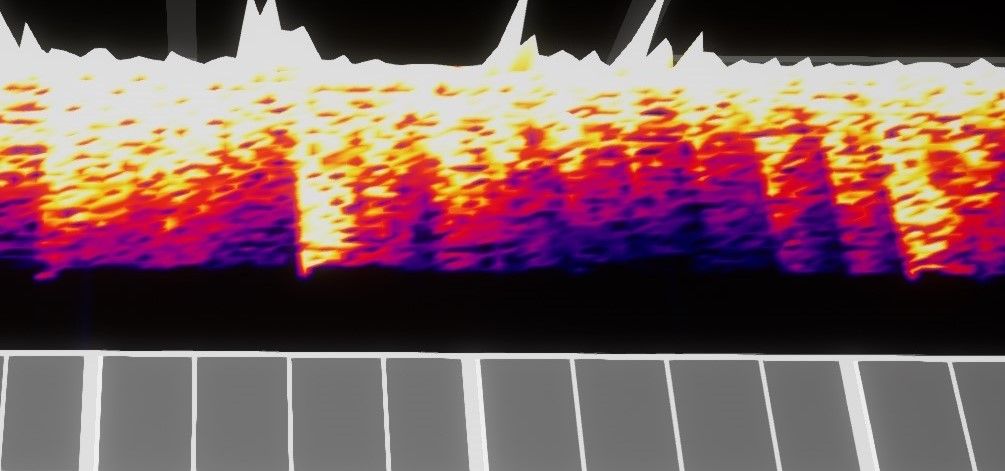 |
| 5 | 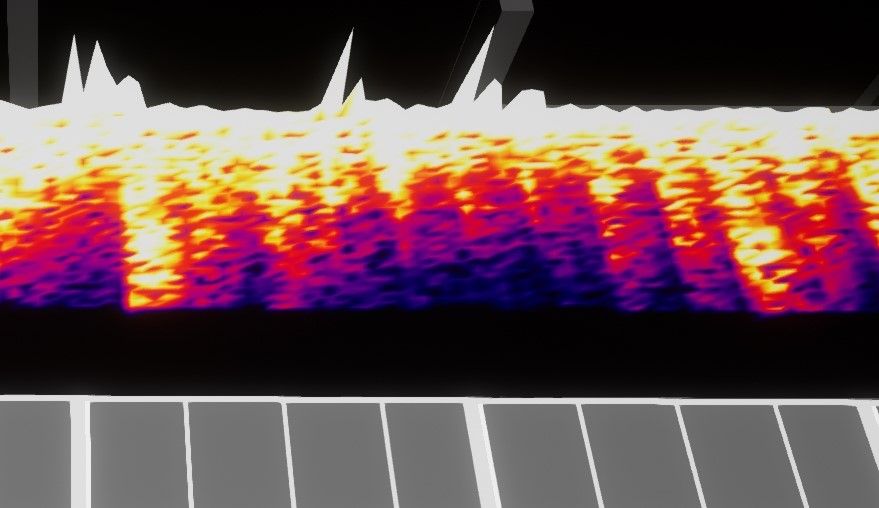 | 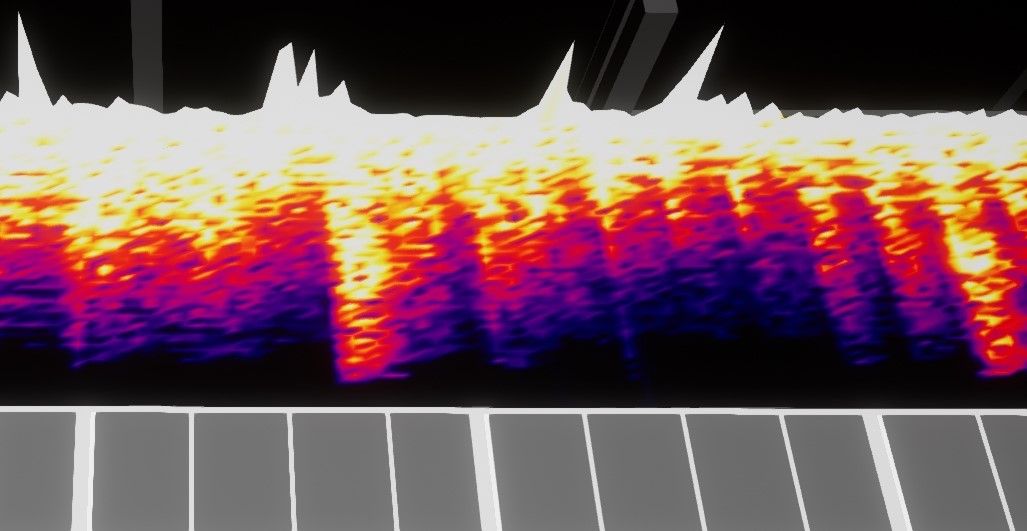 | 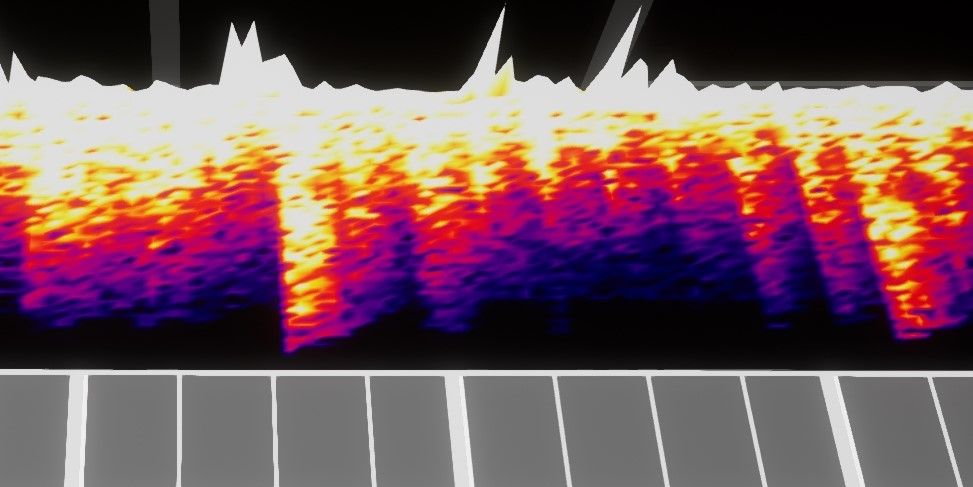 | 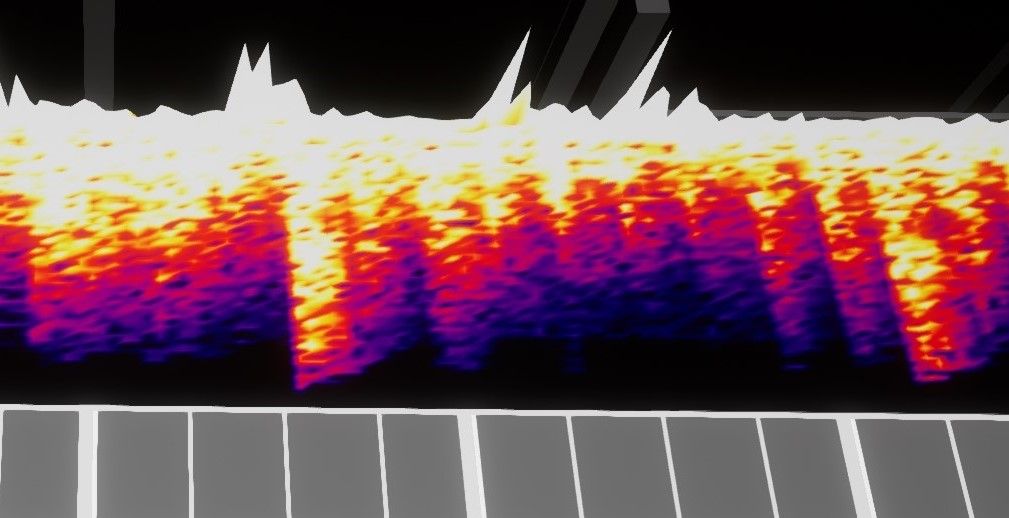 |
| 10 | 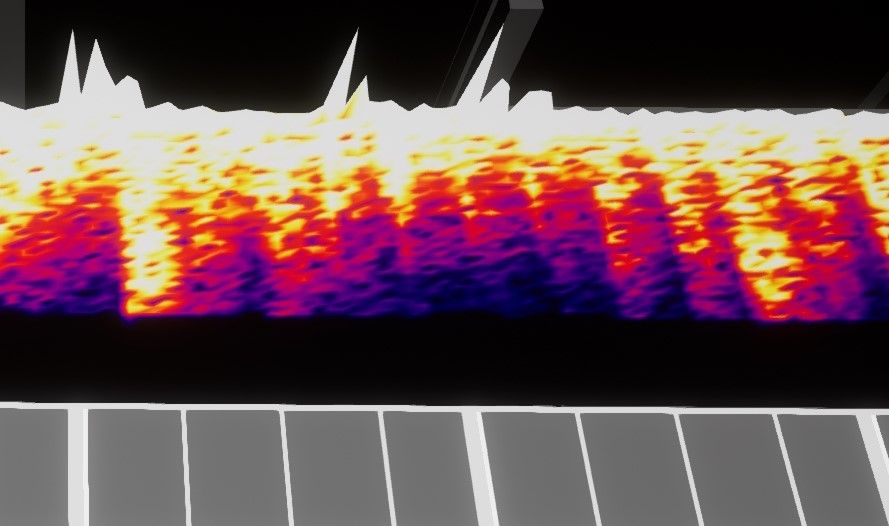 | 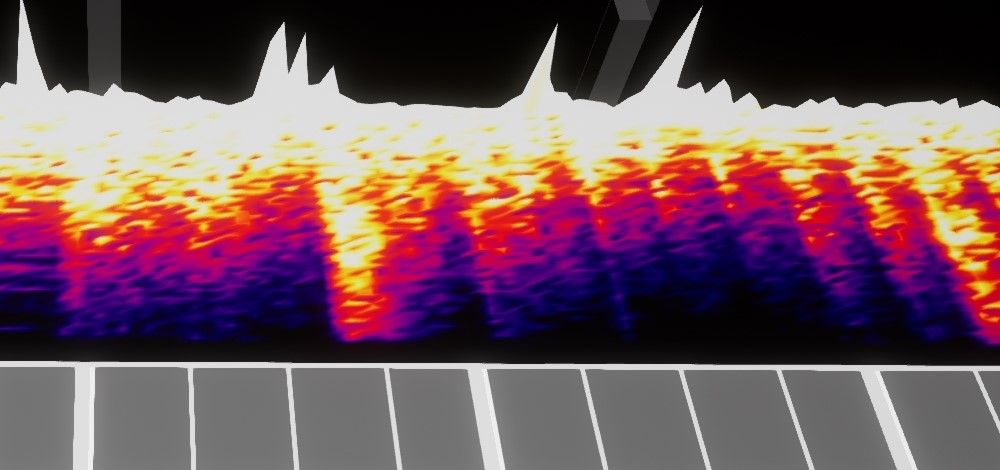 | 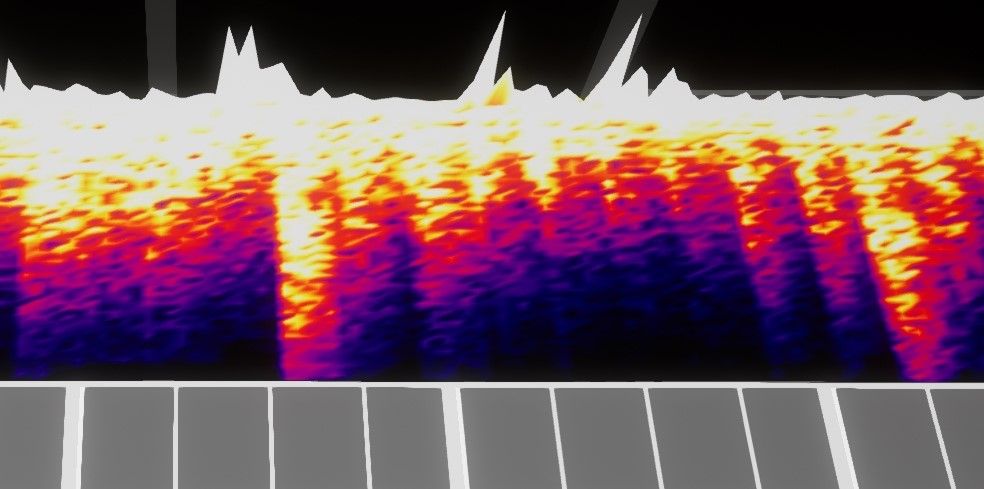 | 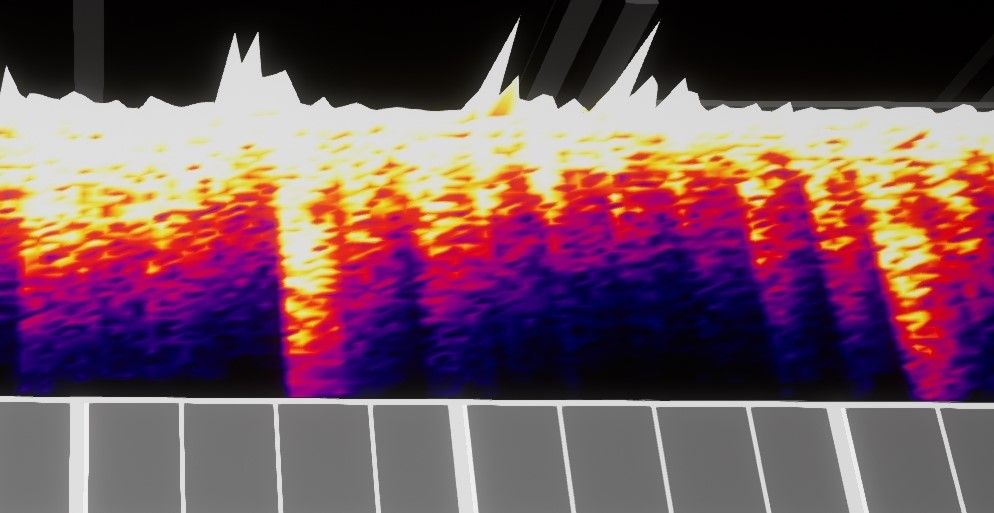 |
Can you see the difference? You cannot scale up audio quality; only starting with a high quality audio file can give you clean, precise lines.
See the Advanced Audio Editing page for more in-depth techniques and tools for analysing the audio quality of files.
Syncing Audio
To make it easier to map and make sure that the song is synced perfectly to the game's beat you need to set up your audio file correctly. This section will assume you are using Audacity.
Plan Your First Note
Analyse the intro of the song. Depending on where in the song you want to place your first block, you'll need to avoid both a hot start (not enough time before the first block) and a too-long intro. Your song will fit into one of three categories:
- Songs with no intro: It is critical to leave at minimum two seconds of preparation time for the player before the first playable note(s) in your map, otherwise this is known as a "Hot Start."
- Songs with a short intro: If your song has a short intro that is less than eight seconds it is OK for the music to start playing immediately.
- Songs with a long intro: If the song has a very long and uneventful/fade-in intro for more than ten seconds it is strongly recommended to shorten the intro so the first note(s) are placed within eight seconds from map start.
In all cases above you will need to time shift the song to an appropriate time based on your needs:
- No intro: Move the song back in time (to the right in the audio track), placing the first mapped note(s) after two seconds. Then sync the song to the beat. Later fill the gap with silence.
- Short Intro: Sync the song to the beat and then fill the gap with silence depending on which case applies.
- Long intro: Move the song forward in time (to the left in the audio track), placing the first note(s) within 8 seconds, then trim the audio before 0 seconds.
There are two ways to sync your audio:
- The recommended method for syncing songs is by using Arrow Vortex.
- The alternative method for syncing songs is by manually doing it using a Click Track.
Sync using Arrow Vortex
Arrow Vortex is a free tool to analyze a song's BPM automatically. It will also find the offset needed to line the audio up to the beat in Audacity or your map editor.
Using Arrow Vortex to find BPM and offset:
The steps listed below are the same as those used in Ryger's Arrow Vortex BPM Analysis Video Tutorial (which also includes BPM confirmation).
- Download Arrow Vortex (AV), extract the file, and open
ArrowVortex.exe- BSMG Re-packed Zip Download (Recommended Method)
- Arrow Vortex Website Rar Download
- You will need additional software such as 7zip to extract
.rarfiles such as this one. - If Arrow Vortex does not open see troubleshooting.
- Export your song to
.oggusing Audacity- Using other formats (ie.
.mp3or.m4a) adds a delay to the audio that varies every time and is not accounted for when you export your changes for use in editor.
- Using other formats (ie.
DANGER
This is a critical step!
Not using a .ogg file or using the export feature in AV will desync your song by an inconsistent amount of time.
- Drag the song file into the AV window
- Go to the
Viewmenu and clickTime based (C-mod)to see the waveform- Use CTRL + mouse scroll to zoom
- Go to the
Tempomenu and clickAdjust sync...or just press SHIFT+S to open the adjustment window. - Click the Find BPM button
- If you're lucky, AV will return a single BPM value with 100% confidence.
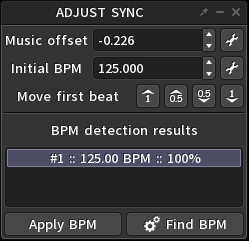
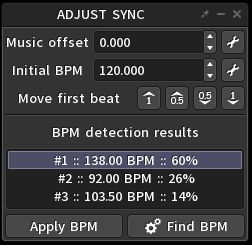
- If you get multiple options you will want to listen to the options to see if they match with the song. Most of the time it will be the first option but follow steps 7 and 8 to make sure.
- If you're lucky, AV will return a single BPM value with 100% confidence.
- Click the Apply BPM button
- Press F3 to turn on beat ticks and press Spacebar to listen through the song to confirm that the beginning, middle, and end of your track are all lined up.
- If only a single result was given and the ticks do not match, this suggests that the song has a variable BPM.
- If the detection gave multiple options and the ticks do not match, select the next option, click the Apply BPM button and listen again. If none of the options work for the song, this suggests that it has a variable BPM.
NOTE on Variable BPM
It is recommended that newer mappers choose a different song due to the increased difficulty associated in mapping variable BPM. Not sure if your song is variable? Drop by BSMG's #mapping-discussion and ask!
If you have the experience, see Advanced Audio Editing: Variable BPM on how to account for this.
- Give the player about two seconds to get ready by clicking the
Move first beatbuttonhowever many times needed to get your start time close to 2.000 seconds or the sound you want to place your first note on aligned with the first bar.
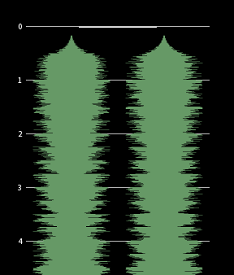
- After aligning, you should check the song again to verify that the beats still match.
- Now that you have the BPM and offset, you will need to add or remove the right amount of silence to the song track.
If you have a positive offset, you will need to add that amount to the intro.
- Open the song in Audacity if you haven't already done so, then switch to the Selection Tool (
).
- Place the cursor at the start of the song track (Click on the song track and press your Home key).
- Click
Generate – > Silence...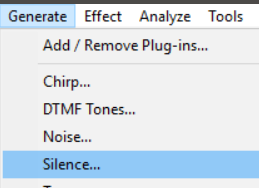
- Input the sync
Music offsetvalue you got from Arrow Vortex (or similar tool) and then click OK. - Done. You can now skip to exporting or go to optional audio editing.
After generating the silence you can click the dark line in the song track to get rid of the cut.
If you have a negative offset, you will need to remove that amount from the intro.
- Open the song in Audacity if you haven't already done so, then switch to the Selection Tool (
).
- Add a new mono track

- Select the new track and tap the Home key.
- Click
Generate – > Silence...
- Enter the amount of negative offset found in Arrow Vortex (or similar tool) into the Duration field and click OK.
- You should see something similar to this
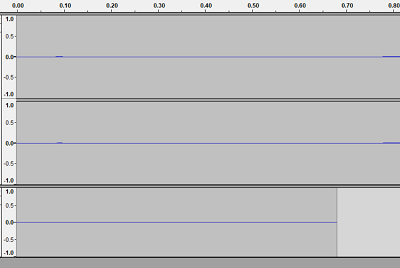
- You should see something similar to this
- Select from the end of the generated silence (yellow vertical line) to the start of the song track selecting the contents of both tracks.
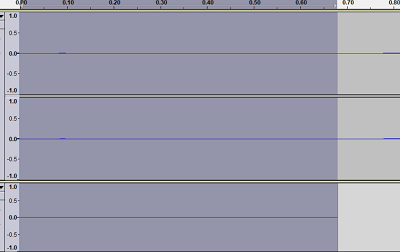
- Press the Delete key.
- Click the X on the newest track to delete it.
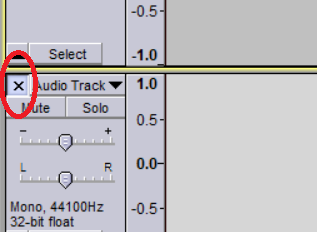
- Done. You can now skip to exporting or go to optional audio editing.
If you are not comfortable with removing the exact amount, you can remove more than needed, export the changed
.oggand re-sync using your tool with the new file to get a positive offset.
Troubleshooting Arrow Vortex
The code execution cannot proceed because MSVCP120.dll was not found
- Install vcredist_x86.exe in your preferred language and try again.
- If it still does not work, make sure you are downloading the
x86version near the bottom of the page. Not thex64version.
- If it still does not work, make sure you are downloading the
Sync using a Click Track
Manual BPM Calculation
If the method above fails you will have to manually find the BPM, but this is easier than you might think.
- Use an online BPM tapping calculator (like the Tap for BPM Tool, open the page in your web browser).
- Play the song in your favorite music player.
- With the webpage in focus, tap any key to the beat (every quarter note) for about 30 seconds and the tool will display the BPM of the song.
- Take note of the nearest whole value.
Add a Click Track
This is to confirm that the BPM you have found online or manually matches the audio file you have. This addition is temporary; you should remove the click track before exporting your audio.
- Open the song you want to map into Audacity.
- Add a new mono track from
Tracks menu > Add New > Mono Track - Place the cursor at the start of the new track (Click on the track and press your Home key) and then click
Generate menu > Rhythm Track... - Input the nearest whole BPM you got earlier into the
Tempo (bpm)field and enter the duration of the song in the optionalRhythm track durationfield (the duration is displayed at the top right of the timeline). - Copy the other recommended settings below:
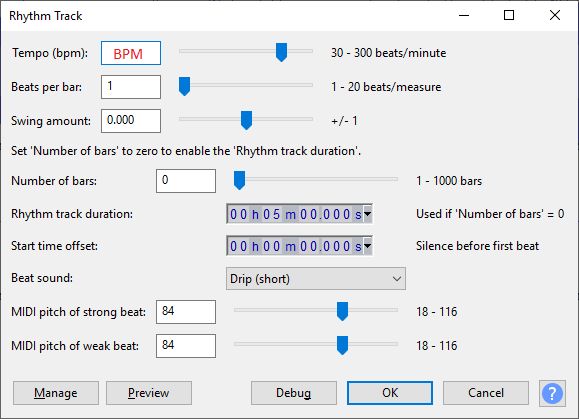
If everything was correctly input you will have something like this: 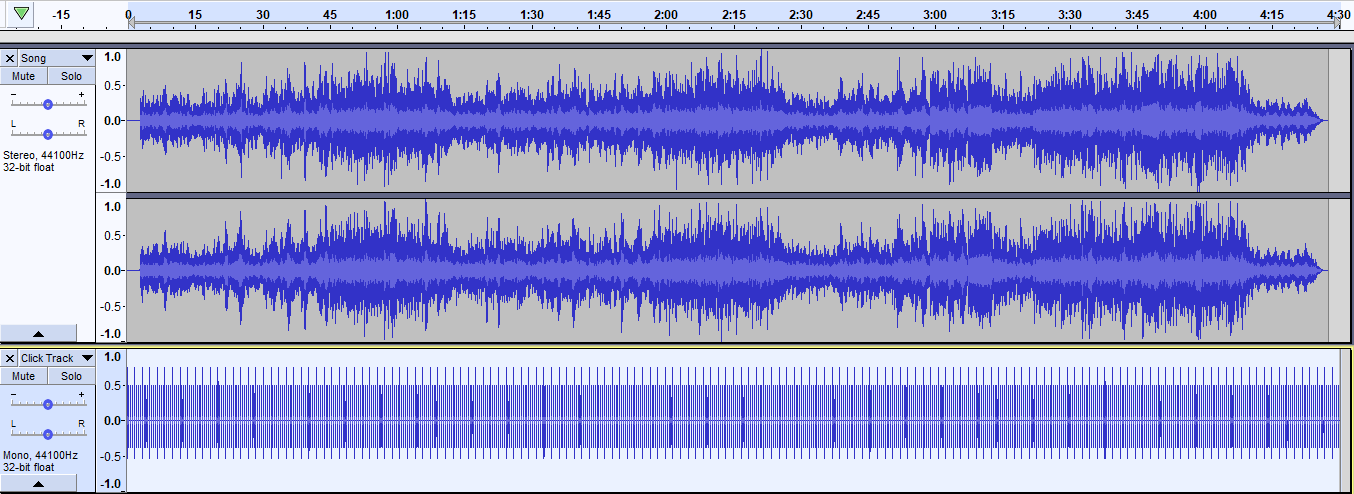
This click track is completely in sync with the beats in the map editor and game, but the song is currently not synced. Continue below for how to do that.
Sync the Song to the Beat
- Select the Time Shift Tool (
).
- Left click on the song track and hold, then drag the audio so that the first planned mapped note(s) in your song ends up within the appropriate seconds (see timeline above the track) to avoid a "Hot Start" or too long intro (See Plan Your First Notes if you haven't already).
- Release to place the audio in the new position.
- Play back the audio in this position. The song will be out of sync, so find the closest beat in the click track and align your song to the beat (click track) by moving it backward or forwards in time by small increments. Zoom in for better accuracy. Repeat until it sounds spot on.
- When you think you've found the beats of the song to match the Click Track review the whole song to ensure that the BPM you have is the correct one and that the song is in the same fixed BPM throughout the whole song. If not, you might have gotten the wrong BPM, in which case try to tap out the BPM manually (again), see "Manual BPM Calculation".
WARNING
If the BPM is correct for the first part of the song but suddenly change or drifts off then you most likely have a song with Variable BPM, see Advanced Audio Editing: Variable BPM for more info on this subject.
Below shows how it looks like when the first planned mapped note(s) (cursor position) are placed after 2 seconds and the beats of the song is synced to the BPM/Click Track.
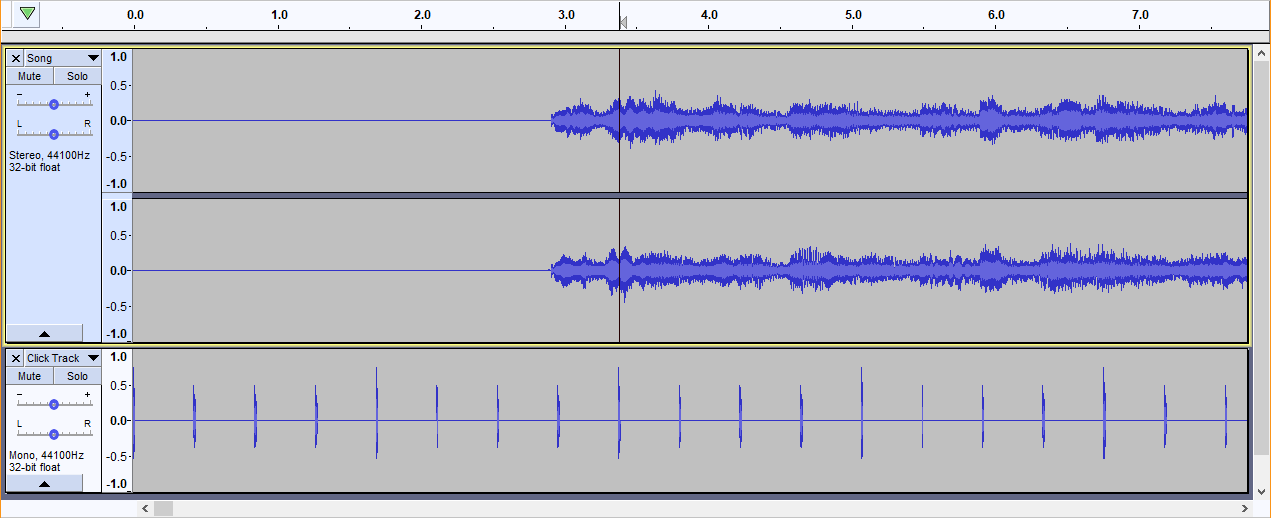
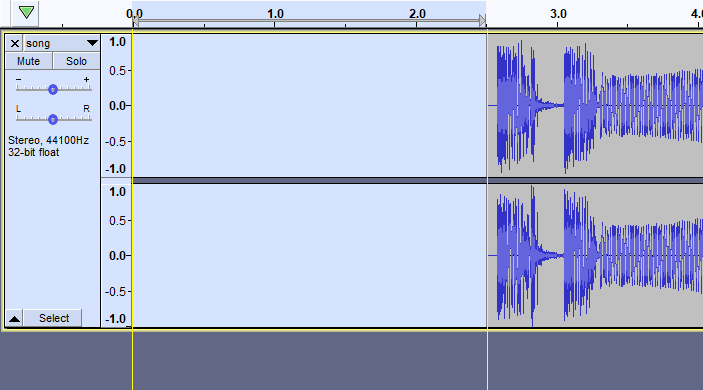
If the waveform/audio clip has a gap to the timeline start (0,0 seconds) you will need to add silence to the audio, or else Audacity will export from the start of the audio clip and you will lose any sync you've done. Do the following to add silence:
- Switch to the Selection Tool (
).
- Select the empty space between the audio clip and the start of the track (Yellow vertical lines will indicate the start and end edges when you make a selection).
- Click
Generate menu – > Silence...
- The right amount of silence should already be input automagically so just hit OK.
- Done. You can now skip to exporting or go to optional audio editing.
After generating the silence you can click the dark line in the song track to get rid of the cut.
Optional Audio Editing
At this point, your audio is set up and ready for exporting. Additional audio editing, while not necessary, can improve the player's experience by:
- Ensuring the audio isn't too soft or too loud;
- Ensuring the start of the audio is smooth; and
- Ensuring the player doesn't have to wait too long for the outro to end.
Check Song Volume
To ensure that your song isn't too soft, or even too loud for that matter, we can measure it using RMS (Root Mean Squared) in Audacity. To have a good balance between note slice sounds and your song the RMS value should be louder than -11db (in the verses and/or choruses) or softer than -8.5db (at the loudest parts).
To check the RMS value in your song do the following:
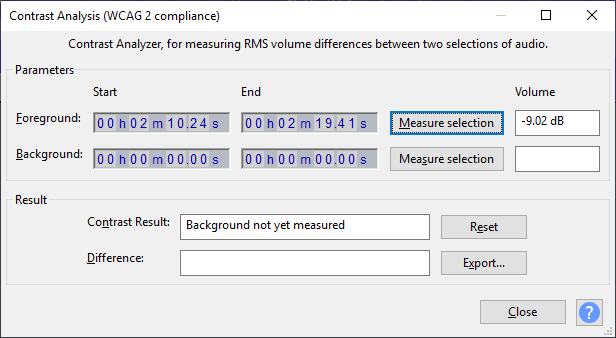
- Open Contrast Analyzer in
Analyze menu -> Contrast... - With the Contrast Analysis window still open, select a part of the chorus section (about 15-20 seconds) of your song
- Click any of the
Measure selectionbuttons. (We only need to use one.) - In the
Volume outputfield you will now find a value. Compare this value to the recommended values above. - If this value is smaller (more negative) than the recommended values, see Volume Modification: Making Your Song Louder.
- If this value is bigger than (less negative) than the recommended values see Volume Modification: Making Your Song Softer.
Volume Modification
Before you continue with the next steps with the song editing it highly recommended to save your current progress as a WAVE file as a backup. This is to ensure that you if you need to go back and redo some of the editing you will have a high quality source to use. (Don't load the OGG you exported as it will have lost a lot of the source quality.) Remove the Click Track if you haven't already done so, then go to File menu -> Export -> Export as WAV, then save the file to a location of your choice.
NOTE
Doing any kind of audio processing on a song will inevitably change its sound, however, it's an important step to give your players the best map and song experience.
Making Your Song Louder
If your song's chorus has a lower RMS value than the recommended -11db then you will need to do Compression and/or Limiting to bring the volume up. (Note: Amplify/Gain is not used for this, as anything above 0db will create an unpleasant distortion.)
To check if you need to apply Compressor before Limiter visually analyse the waveform. If there are a lot of sharp peaks with a pretty constant body throughout the song, as shown in the example below, then you will not need to apply compressor. Only a Limiter will suffice (skip to Limiter).
However, if the waveform varies a lot between soft and loud parts then compression will most likely be needed first.
Compression
- Select the whole song by double clicking the song track.
- Go to
Effects menu -> Compressor - As a starting point, copy the settings below and click OK. Make sure that
Compress based on Peaksis checked.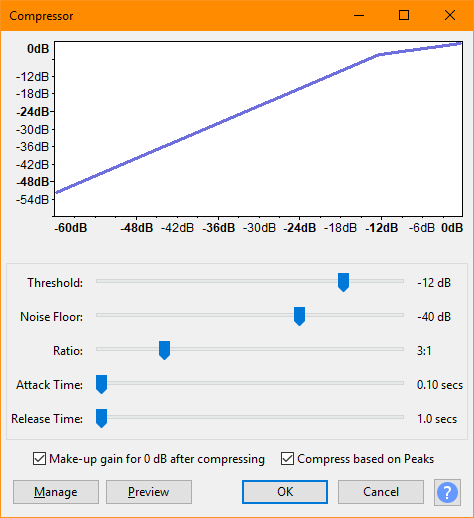
Here's a before (top) and after (bottom) Compressor comparison: 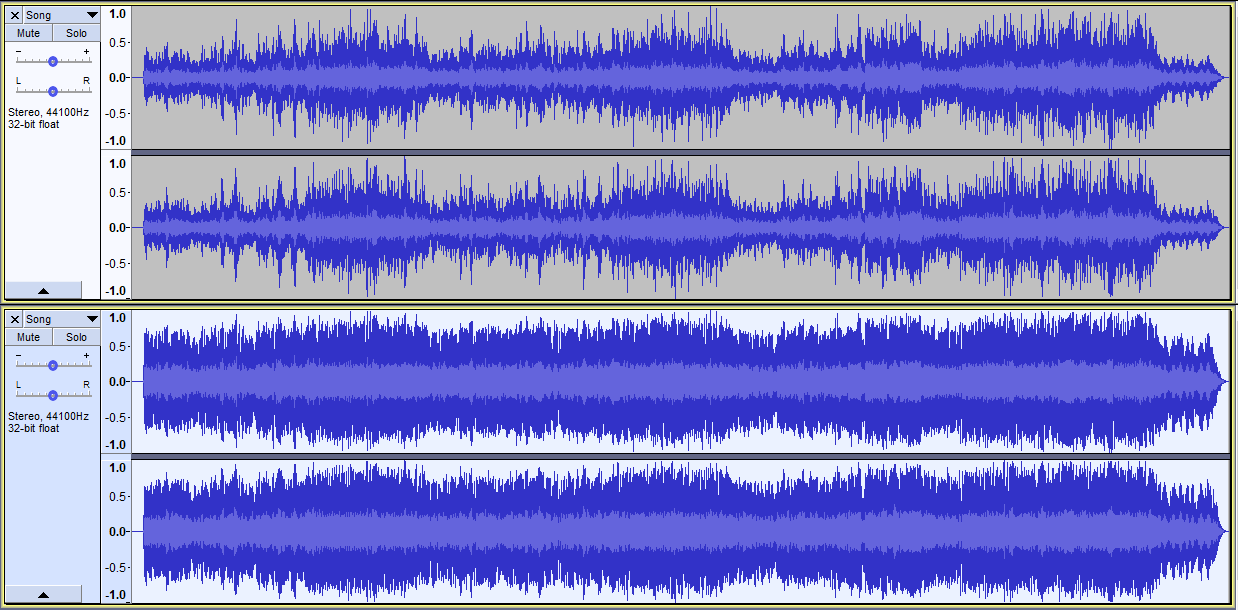
Check the song again and listen for any unnatural distortions, such as volume cut outs after loud peaks. If so, undo (Ctrl-Z), tweak the Threshold setting to a louder one (less negative) and apply again. If you want to know more about the settings check the Advanced Audio Editing: Compressor page.
Limiter
The compressor reduces many of the unnecessary peaks and makes the more important sounds louder. However, we still haven't reached the right RMS volume for the song. To achieve this we will remove more of the headroom using the Limiter effect:
- Select the whole song by double clicking the song track.
- Go to
Effects menu -> Limiter... - As a starting point, copy the settings below:
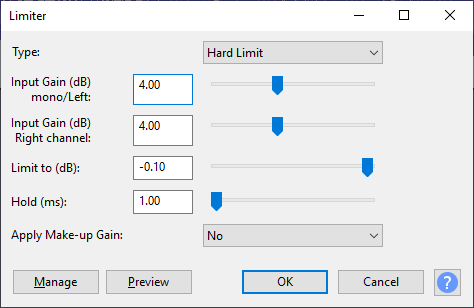
- Click OK to apply Limiter.
Check the song again and listen for any unnatural distortions, such as crushed/severely distorted peaks. If so, undo (Ctrl-Z), tweak the Input Gain settings to a lower value (still above 0db) and apply again. Make sure both Input Gainvalues are the same or else the stereo image will be skewed. If you want to know more about the settings of the Limiter effect check the Advanced Audio Editing: Limiter page.
To know if you've reached the right volume after compressing and limiting check again with the RMS volume tool:
- Open Contrast Analyzer in
Analyze menu -> Contrast... - With the Contrast Analysis window still open, select a part of the chorus section (about 15-20 seconds) of your song.
- Click any of the Measure selection buttons. (We only need to use one.)
- In the
Volume outputfield you will now find a value. This value should be between -8.5db and -9.5db for optimal level. If not, undo the limiter process and increment theInput Gainby +/-0.5db and try again.
After limiting you will have something like this: 
Making Your Song Softer
Some modern electronic music producers have a tendency to make their songs really loud just to have a track louder than other's. In the rare cases you have this kind of song (RMS value above -8.5db) it is strongly recommended to lower the volume of the song to make all Beat Saber songs normalized. This helps with hearing the note slice sounds better and to give the players a much more pleasant experience switching between songs.
Before you lower the volume you want to know approximately how much you need to lower the volume with. Do this by checking with the RMS volume tool:
- Open Contrast Analyzer in
Analyze menu -> Contrast... - With the Contrast Analysis window still open, select a part of the chorus section (about 15-20 seconds) of your song.
- Click any of the Measure selection buttons. (We only need to use one.)
- In the Volume output field you will now find a value. Calculate the difference between your value and -8.5db and remember this value.
- Close the Contrast Analysis window.
Now let's use the Amplify effect to lower the volume:
- Select the whole song by double clicking the song track.
- Go to
Effects menu -> Amplify... - Enter the difference value you calculated earlier (it should be negative) into the
Amplificationfield.New Peak Amplificationfield will repeat what the first input field says, this is normal for a song that is already peaking at 0db. - Click OK to apply a negative Amplify effect.
- Done.
To know if you've reached the right volume check again with the RMS volume tool:
- Open Contrast Analyzer in
Analyze menu -> Contrast... - With the Contrast Analysis window still open, select a part of the chorus section (about 15-20 seconds) of your song.
- Click any of the
Measure selectionbuttons. (We only need to use one.) - In the
Volume outputfield you will now find a value. This value should be between -8.5db and -9.5db for optimal level. If not, undo the Amplify process and increment the Input value by +/- 0.5db and try again.
After the negative value Amplify effect your song will look something like this: 
Trimming the Outro
In Beat Saber the map will continue for as long as the audio file lasts. E.g. this means that having silence for five seconds after the song has ended the map will still play for five seconds before terminating and bringing the player to the score view. This is why it's important to mind the time from the last note to when the audio track ends.
Go to the end of your song and play the last part and outro. From the point where you intend to have the last note(s) count to 3 or 4 seconds and pause the playback. Where your playback cursor is now located is where you should generally cut off your song. (Naturally all songs will differ, so do what makes most sense for your song.)
To trim the ending at this point do the following:
- From the paused playback position drag a selection from here to the end of the track (yellow vertical line) and press the
Deletekey to remove this part. - Make a new selection from the end of the song track (yellow vertical line) and backwards about 2 to 3 seconds.
- Go to
Effects menu -> Studio Fade Out. - Done.
The song will now fade out just before it gets to the end of the map and the player will be presented with the scoring results much faster.
Trimming the Intro
This step can be useful if you need to make a more graceful fade-in for your song.
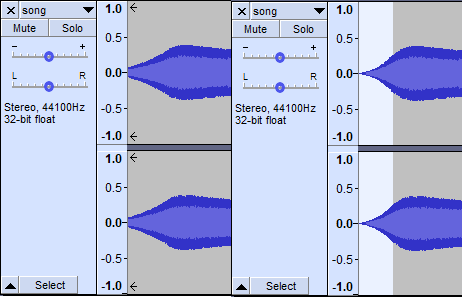
If your track has arrows pointing to the left at the start it means you've time shifted the audio forward in time outside the timeline. If you've done this to shorten the intro, although not necessary, it is beneficial to trim the sound clip and add a fade in. To trim and add a fade in to the song (optional) do the following:
- Drag a selection from 0.0 seconds to the end of the audio track (yellow vertical lines).
- Click Trim audio outside selection (
). The arrows should now disappear.
- (Optional) Make a selection from track start (vertical yellow line) to about 0.5-1 seconds (depending on intro).
- (Optional) Go to
Effect menu -> Fade In. - Done.
Before (left) and after trim and fade-in applied (right):
Exporting
We now have our finished audio that you will use and hear in the editor and the game. It is recommended to make another WAVE file backup just in case you need to export to OGG again with a different quality setting. (File menu -> Export as WAV).
To generate a compatible sound file to use we need to do the following:
- Delete the Click Track (if you haven't already done so).
- Click the
File menu -> Export -> Export as OGG.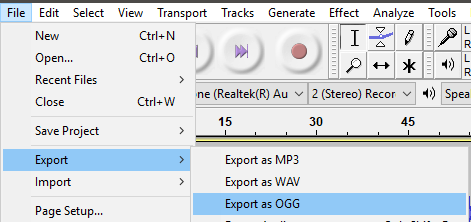
- Name your file
song.ogg. - Choose an appropriate OGG quality (more info here).
- High quality source (WAVE / FLAC / MP3 / AAC) use 6-9 (unless there is a file size issue.)
- Low quality source (YouTube or such): use 3-5
- Click Save.
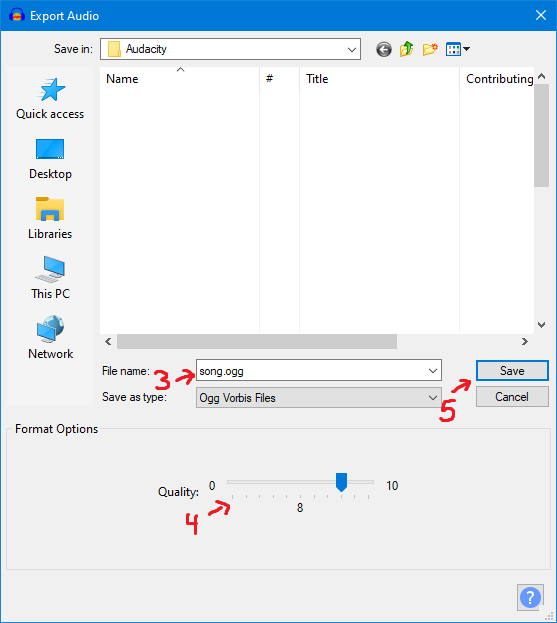
The song/audio file is now ready to be used in any map editor. Input the same BPM you got earlier in your map editor of choice and make sure to use 0ms offset for all difficulties (since the song is already synced to the beat).
NOTE
Audio file should not be larger than ~14 MB due to the BeatSaver 15 MB ZIP file limit. If this is the case export at a lower quality until the file meets the file size limit. ZIP files over 8 MB cannot be shared directly on Discord (without Nitro or Server Boost Level 2) for playtesting.
Credits
Content on this page is derived from guides by Kolezan & Nik.