Extended Mapping
Now that you know the rules, it's time to break them.
This page covers anything and everything that goes beyond standard 4 x 3 grid mapping, including map styles that require additional mods before the player can play and characteristics outside of the "vanilla" ones covered in Intermediate Mapping.
Mapping Extensions
Mapping Extensions is a mod by Kyle1413 which unlocks many special features. Maps made with mapping extensions require the player to have the mod or the map will not work. Mapping Extensions maps are somewhat unstable and may break during updates... proceed with caution.
Set-Up
Every editor is unique in both their setup and support for Mapping Extensions (ME). Editors known to support ME along with instructions on how to setup are as follows:
- Mediocre Map Assistant 2
- Beatmapper
- ChroMapper
ME setup for MMA2 with Beat Saber Installed
NOTE
This section assumes you are using the CustomWIPLevels folder in a Beat Saber install. Follow the without Beat Saber Installed instructions if you store your maps in a different location.
- Start Beat Saber and then close out after the game finishes loading. This is to ensure the game is ready for mods to be installed.
- Open Mod Assistant
- Make sure the version selected in the dropdown is compatible with the Beat Saber version installed on your computer.
- Check the checkbox for MappingExtensions. (You can select additional mods to install as well.)
- Click Install and Update and make sure there are no errors.
- Open Beat Saber again to initialize the mods you have installed then quit the game.
To check if it worked navigate to your Beat Saber install and make sure that a MappingExtensions.dll file is present. Not sure where Beat Saber is installed? See FAQ: Install Folder.
- You are now ready to do map setup!
ME setup for MMA2 without Beat Saber Installed
Here you will need to "trick" Mediocre Map Assistant 2 that your folder is a Beat Saber install.
Option 1:
- Download this zip for pre-formatted folders and Mapping Extensions Mod here.
- Extract the zip to a location of your choice.
- Enter the path to the CustomLevels and CustomWIPLevels folder near the bottom of the Settings Bar.
- Example Path:
C:\Users\bsmg\Documents\Beat Saber\Beat Saber_Data\CustomWIPLevels
- Example Path:
- You are now ready to do map setup!
Option 2:
- Create a folder named
Beat Saberin the location you want to store your maps. - In that folder, create two folders,
Beat Saber_DataandPlugins. - In
Beat Saber_Datacreate aCustomWIPLevelsandCustomLevelsfolder. - Enter the path to the CustomLevels and CustomWIPLevels folder near the bottom of the Settings Bar.
- Example Path:
C:\Users\bsmg\Documents\Beat Saber\Beat Saber_Data\CustomWIPLevels
- Example Path:
- If you have maps already, go ahead and move your maps to
CustomWIPLevelsyou just created. - Go to the
Pluginsfolder you made, and drop the latestMappingExtensions.dllinside which can be found on BeatMods. - You are now ready to do map setup!
Map Setup in Mediocre Map Assistant 2
- Open Mediocre Map Assistant 2
- In the Settings bar on the right, 3 new tick box options should be available under the Beta section:
- 6 Lane Mode - Extends the number of lanes available to map blocks to from 4 to 6. Also enables placement of walls outside of the lanes.
- Precision Placement - Allows blocks, walls, and bombs to be placed at a finer resolution than the current grid.
- Precision Rotation - Allows blocks to be angled at any angle instead of the default 45-degree increments.
- Enable the desired features by clicking the checkboxes. For example, wall mapping needs 6 Lane and Precision Placement.
- Select the level you want to map in and click on the ExtraFields tab to the right of the difficulty select.
- Click the Requirements tab and then type in
Mapping Extensions.WARNING
The text you enter in the requirements has to be exact or else the features will not enable in editor.
- Click the Add button to add it to the requirements.
- Click Save song infos in the bottom left corner.
- Click Edit Level and you are good to go!
Multi-Lane Mapping
NOTE
MMA2 only supports up to 6 lanes. If you wish to use more than 6 lanes, consider using other map editors like ChroMapper.
6 Lane Mode extends the playable grid to 6 x 3. It is often used with wall mapping to place fancy walls in the extension area while keeping the standard 4 x 3 play area clear.
Have you ever heard of, or even played, maps with a ridiculous amount of lanes that really make you move, such as $100 Bills with 100 lanes, or GHOS7 with 8 lanes?
These maps utilize multi-lane mapping! Do you want to want to make maps that also use multiple lanes? Then you've come to the right place!
Mapping With More Than 4 Lanes
If you wish to create a good multi-lane map that is neither a challenge map nor a meme map, you must choose your placements wisely.
Things To Keep In Mind When Mapping With Multiple Lanes
Pattern Width: If you are mapping with more than the standard 4 lanes, then you are probably aiming to force or highly encourage movement in your map. If you are, then you should avoid patterns that may make the player feel like they are being pulled apart by some evil torturer's device. Patterns should avoid stretching between each side of the map simultaneously, as this can be very difficult or uncomfortable to play. Instead, patterns should encourage or even force the player to move or lean to a side.
Awkward Wide Stretch Lean/Move Wall 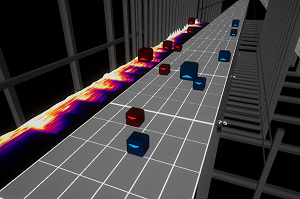
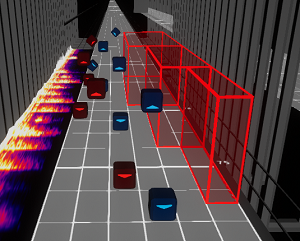
Emphasis: There is a lot of variety in representing emphasis in a pattern. One way of emphasizing a pattern is through width, and with an extra amount of lanes, you can really take advantage of that.
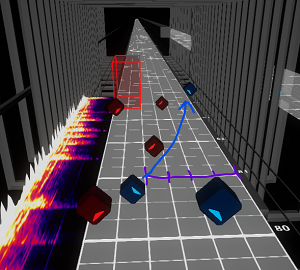
Precision Placement
Precision placement allows the mapper to place blocks anywhere within the grid, no longer limited to the 12 basic block positions. This is often used in tandem with Precision Rotation.
How To Use Precision Placement
Before continuing setup for precision placement, ensure that you have followed the steps from the Set Up section.
After completing those steps, enter the editor and press the ESC key. On the left side of the escape menu, you should see a precision snap option that looks like this: .
The default value is 1/1, which means that the note will snap into the squares on the grid. The more you increase the number, the more precise you can get and the less it directly snaps into the squares. You can think of it like changing your cursor precision.
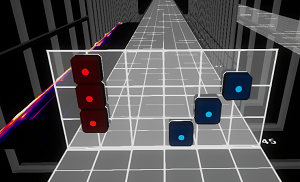
What Can You Do With Precision Placement?
Precise Note Placement: As the name suggests, you can place notes in really precise places on the grid.
Say you want a specific pattern in your map, but it requires the note to be in a very certain spot that would not be accessible with normal placement - this is where precision placement comes in handy.Pauls: You may have played a map with a Paul or Poodle (Noodle Extensions Paul) in it. Although it is recommended to make Pauls with Noodle Extensions because of the tools that make it a lot easier, you can still make Pauls with mapping extensions.
Mod Charts: Although you can use precision placements to make wall maps, you can also use it to make art with notes. The map Centipede is an example of just that.
Precision Rotation
Precision rotation allows the mapper to rotate blocks at any angle, no longer being limited to only 45 degree increments. This is often used in tandem with Precision Placement.
What Can You Do With Precision Rotation?
Tech Maps: You may have seen or played some tech maps that use precision placement to get very unique angles. Though uncommon, precision placement can certainly get you very specific angles that you may want.
Use With Precision Placement:
Most of what we talked about in the Precision Placement section can also be used alongside precision placement, whether it be for making a specific Paul or Poodle, or a really cool looking mod chart utilizing notes as its main focus.
Wall Mapping
NOTE
This is a stub section. If you'd like to contribute, submit suggestions via this form.
Wall mapping allows the mapper to get incredibly creative with wall placement well outside of the standard grid. Editors that support Mapping Extensions can be used in some capacity to create these maps. However, more complex wall sequences are often accomplished through the use of scripting tools like BeatWalls by SpookyGhost. There currently are two categories of wall maps.
Atmospheric Walls: Walls create an ambience to fit with the mood of the song
Interactive Walls: Walls add to add cool effects based on the song.
NOTE
Too many walls will create heavy lag. Especially for players that do not have powerful computers. Test frequently and try to keep the wall-count down to keep your experience accessible for most players.
Wall Mapping using MMA2
After editor setup, check that you have at least 6 Lane Mode and Precision Placement enabled. When editing your map, if you select the wall placement tool the grid will expand, allowing you to place walls anywhere on the track similar to regular wall placement. To make smaller walls, you need to change the precision. Go into the editor menu by pressing ESC or clicking the hamburger in the top right and change the Precision Snap value. This is a similar to the Cursor Precision setting.
Wall Mapping using Beatwalls
For setup and usage, see the documentation and examples in the github repository.
Wall Mapping using ScuffedWalls
Inspired off of Beatwalls it strives to provide additional features to make working with NE animations and other map object custom data easier. Repository with download and documentation is available here
Fast and Hyper Walls
Walls that zoom by the player are called Fast and Hyper walls. They are created using a negative value for the duration parameter which varies based on half-jump and wall duration. Values for the type of wall can be found in this negative walls document.
- MMA2/ChroMapper: You can create fast/hyper walls by pressing CTRL + F while your cursor is on a wall until it is yellow. The length of the wall is the duration, see the negative walls document for the appropriate length.
- Beatwalls: Fast/hyper walls are created by overwriting the duration property with
changeDuration: -3.
Remember!
Too many walls will create heavy lag. Especially for players that do not have powerful computers. Test frequently and try to keep the wall-count down to keep your experience accessible for most players.
Testing your map
While you could playtest your map ingame every time you make changes, this will be unpractically in the long run. Luckily there are some mods to help you out.
- SiraUtil - Allows camera movement while a map is playing when using FPFC. See In-game with FPFC for setup and usage.
- ReLoader - hot reloads the map
- PracticePlugin - change Song time, playback speed and more from the pause menu
Extended Characteristics
These characteristics (with the exception of 360°/90° mode) take you beyond official characteristics like OneSaber or NoArrows. Not all editors have the same capabilities. You may need to manually insert characteristic data in the Info.dat file.
You may find the Map Format Page page to be useful in this process.
To Add a New Characteristic
- Create your new difficulty file in your favorite editor.
- When finished mapping, rename the difficulty file to include the characteristic name. (example:
EasyLightshow.dat) - Make the following changes to the
"_beatmapCharacteristicName"and"_beatmapFilename"in yourInfo.datfile:
"_difficultyBeatmapSets": [{
 "_beatmapCharacteristicName": "Lightshow",
 "_difficultyBeatmaps": [{
  "_difficulty": "Easy",
  "_difficultyRank": 1,
  "_beatmapFilename": "EasyLightshow.dat",
This Pastebin link provides an example of a Info.dat file using two characteristics (Lawless and Standard)
360°/90°
WARNING
It is recommended that you understand basic and intermediate mapping practices before stepping into 360°/90° mapping as it requires adapting to different mapping practices and style.
360°/90° mode introduces new ways to play Beat Saber with notes spawning from different angles and direction, which opens up a lot of mapping potential and freedom as a whole.
- Info.dat Names:
360Degree90Degree
Lawless
WARNING
This characteristic requires the SongCore mod to function.
- For PC Players without the mod, the whole map will load indefinitely and will be unable to play any other difficulty in the map.
- For Quest players, this characteristic will be removed at import. Vanilla characteristics will still be playable.
The lawless characteristic is exactly what it sounds like... no rules, just right. Want to get crazy experimental and try some things that might be downvote magnets? Pop them into the Lawless characteristic to separate it from standard levels.
- Info.dat Name:
Lawless
Lightshow
WARNING
This characteristic requires the SongCore mod to function.
- For PC Players without the mod, the whole map will load indefinitely and will be unable to play any other difficulty in the map.
- For Quest players, this characteristic will be removed at import. Vanilla characteristics will still be playable.
The Lightshow characteristic is used for maps with no notes which allow players to enjoy a lightshow experience. Bombs and walls are optional as long as they are not in the way of the players.
- Info.dat Name:
Lightshow
360°/90° Mapping
WARNING
It is recommended that you understand basic and intermediate mapping practices before stepping into 360°/90° mapping as it requires adapting to different mapping practices and style.
Rotation Events and Values
Two new "official" event types were introduced in v1.6.0 as part of the lighting events schema:
- Event Type 14 (Early Rotation): Rotates spawn point at the same time as the notes/obstacle.
- Event Type 15 (Late Rotation): Rotates spawn point while ignoring the notes/obstacles at the same time as the event.
Each event has a value for spawn rotation which is always relative to the player's current position:
- [0] 60° rotation counter-clockwise (Left)
- [1] 45° rotation counter-clockwise (Left)
- [2] 30° rotation counter-clockwise (Left)
- [3] 15° rotation counter-clockwise (Left)
- [4] 15° rotation clockwise (Right)
- [5] 30° rotation clockwise (Right)
- [6] 45° rotation clockwise (Right)
- [7] 60° rotation clockwise (Right)
The specific format for a rotation event is defined in the Map Format page.
NOTE
The chevron in the 360° Glass Desert environment rotates corresponding to the rotation event time, both 14 and 15. This is important as it guides the player where to face in gameplay.
Do not use spawn rotation events outside of 360°/90° mode. While they will work, it's highly recommended that mappers not use this. Standard environments do not have a rotating chevron to indicate movement and the environment itself will block the player's view.
Editing 360°/90° Maps
There are multiple ways to map for 360°/90° mode. The following sections cover some pros and cons of each method:
ChroMapper
ChroMapper, now in open Beta, natively supports 360°/90° mapping. See detailed support for extended mapping on the ChroMapper Wiki
- Pro: Natively supports 360°/90° mapping
- Pro: Better visualisation of 360°/90° mapping.
Mediocre Map Assistant 2
Be sure to create a new characteristic, "360Degree" or "90Degree". If it's not available, you may need to create one by replacing existing characteristic or creating a new one.
Option 1: Complete the map in the MMA2 then apply rotation events in the legacy official editor.
- Pro: Relatively easy and effective.
- Con: Requires downgrading the game. Can cause offset and BPM change rounding errors and any non-standard custom data will get deleted and need to be edited in afterward.
Option 2: Using laser speed event as spawn rotation event (ADVANCED METHOD)
- Pro: Retains custom map data.
- Con: Can be confusing at first but gets easier the more you work with it.
Laser speed events being used as spawn rotation events.
- Left Laser Speed Position is Spawn Rotation Event 14
- Right Laser Speed Position is Spawn Rotation Event 15
This mimics laser speed events as spawn rotation events given the value (see above). It is recommended to use this method with an empty lighting event track to avoid mistakes. Lighting can be added once the laser speed events have been converted.
To manually replace the values, open the difficulty file in any text editor and replace "_type":12 or "_type":13 with "_type":14 or "_type":15. This should be the last step you do otherwise you'll have to revert the event swaps every time you have to make any changes in the editor. Always create backup in any case.
DANGER
Do not open a 360°/90° map containing event type 14 in MMA2 as it converts the value into BPM changes, which end up crashing the program or triggering weird behavior.
JSON/DAT Editing
If you're feeling adventurous, rotation events can be manually edited into your difficulty.dat files. Just like with lighting events, this has to be sorted by time; otherwise the level will be broken. Use +1 Rabbit's Note Sorter to fix your map before uploading.
{
  "_time": #,
  "_type": 14/15,
  "_value": #
}
360°/90° Best Practices
NOTE
360°/90° mapping is still new and these best practices continue to evolve. If you'd like to contribute, submit suggestions via this form.
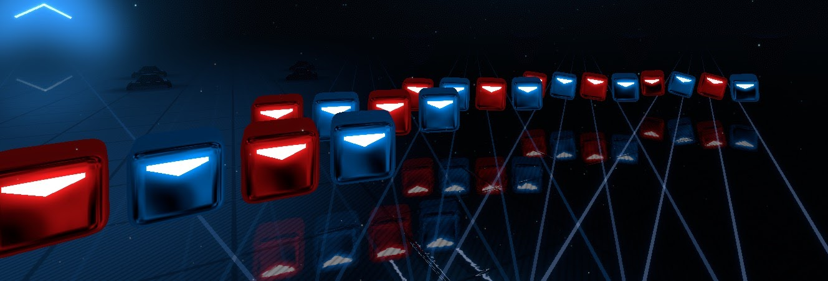
Notes overlap, be aware of them. Image for reference (each note row is 1/4 apart at 15° rotation).
DO'S
- Keep the user's field of view in mind. They can only see +/-15° with full vision and +/- 30° with peripheral vision.
- Primarily use event 15 (late rotation). This allows you to direct the player where the next lane rotation is with the chevron after the next block hit.
- Make use of both event 14 (early rotation) and 15 (late rotation):
- A good example of this would be using walls and notes spawning at nearly the same time but different spawn rotation.
- This prevents the chevron from twitching in weird ways; very useful if you want to tell the player to keep facing in the same direction while having multiple spawn rotations.
- Stick to 15° rotational changes and occasionally 30°, given hints and enough time to adjust.
- Use walls or bombs to telegraph large angle changes if you use them and keep notes to the center 2 lanes
- Having notes in the outer lanes is similar to using 6 lanes where the player has to stretch out to hit the notes.
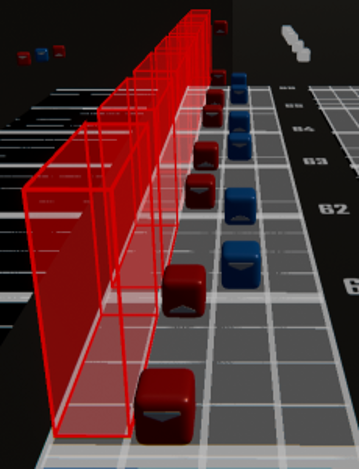
- Having notes in the outer lanes is similar to using 6 lanes where the player has to stretch out to hit the notes.
- Side hits in the direction of rotation are one of the best ways to indicate rotational change.
- Use sliders to indicate (big) rotational change.
- Instead of a conventional slider pattern, the notes are on at the same lane and same row while having rotational event for each note in the sliders.
- Example usage by techbutterfly YouTube
- Wide stream patterns help readability when using rotation events during streams.
- Playtest your map way more frequently then mapping regularly
- Using 1/3 precision, BPM changes, or editor offset can cause precision errors which lead to unintended results.
- NJS and offset value is important for readability. You'll have to do plenty of adjustments to get the value that feels natural to read on different spawn rotations.
- Give the player enough time to read/prepare where the next rotation will be.
- Using both -15° and 15° on a section at the same time can be hard to read, especially at speed.
- If you have the player to turn >30° rotation, give the player time to adjust and prepare for the next note.
- The more you place rotation events that go outside the player's FOV, the more disorienting it gets; it isn't a bad mapping practice but it's something to be aware of.
- Be sure to keep in mind where the player's cable will be. While full rotations are fine for Quest, rotating a headset with a cable can cause tangles, which can be a hazard. You can avoid this by spinning the player back around after a full rotation.
DONT'S
- Don't force rotational movement on fast paced section. Players' brains can only handle so much at once.
- Using rotation events too quickly (less than 1/2 a beat between events) or too often can be disorienting
- Exception: E+ given plenty of playtesting or when using them for cosmetics such as walls or a chevron spin
- Don't disembody notes too much,
- Avoid using dodge wall or bombs that may interfere with the player motion
- Don't mix multi-lane with 360°/90° unless the extra lanes are dedicated to walls
- Avoid using extreme single rotation events (+/- 45/60 degrees). Instead, consider using multiple 15 degree increments with walls to guide the player.
- Exception: Plenty of time/warning on any difficulty
- Copying a Standard map (Especially E+) and slapping rotation events is probably not a good idea. While the conversion can work out without any FOV or vision blocking issues, recreating your map for 360 can allow you to take advantage of wall and chevron spins (which are pretty fun)
- Exception: This technique can work ok on lower density (i.e., dancey) maps, though it will still need some adjustments to play well in 360°.
- Middle row outer lane notes are most likely going to be a vision block.
- If you have a middle row block on the outer left lane and you're rotating to the left, everything on the left will be a vision blocked, and vice versa.
- You can have middle row block on the left outer lane and rotating to the right as it won't be a vision block.
Credits
Content in this section was authored by The Good Boi, Bloodcloak, Spooky Ghost, Caeden117, Kival Evan, Checkthepan, and 3Stans