gamesequence's guide to materials
Intro
NOTE
This guide was made under the assumption that you have basic knowledge of materials in Unity.
Materials are what make our models look nice in-game. Material effects are achieved by using shaders. There will be examples shown that are designed to either teach you how to achieve certain effects or give you inspiration on what effects you want to give your models. The shaders used for each effect will be listed.
Unlit Glow
The Unlit Glow shader is one of the shaders already included in your projects usually. This is a very easy to use shader to achieve simple effects in-game.
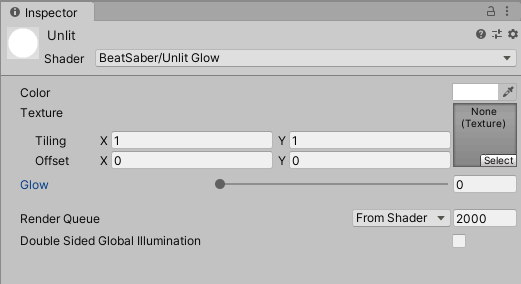
Breakdown of the Unlit Glow Shader:
- Color: Changes the color of the object.
- Texture: You can add any texture to your object.
- Glow: Controls the amount of glow your object has.
Uber Shader - Ikeiwa
You can obtain this shader in the BSMG's #pc-3d-modeling channel.
This is useful for making terrain or realism effects.
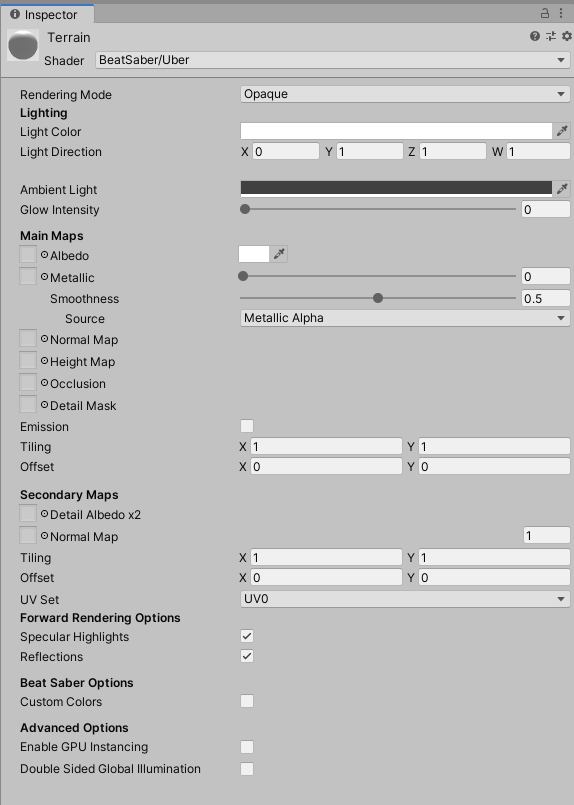
The uber shader is just like the standard shader in Unity. You can use normal maps, height maps, etc. The only difference is that the lighting is local to the shader and not the environment.
Here is a breakdown of the Uber Shader (Not everything is listed to keep things simple):
- Rendering mode: Can change between Opaque, Cutout, and Transparent.
- Light Color: Can change the color of the light cast on the material.
- Light Direction: can change the direction of the light.
- Ambient Light: Can add some additional light effects.
- Main Maps: This is where you put your image texture along with all the respective maps.
- Emission: This adds a light effect to your object.
- Secondary Maps: You can add extra maps to add on to your effects.
https://www.youtube.com/watch?v=bVaVaPi8Ke8 is not a valid YouTube URL!
Materialize
Materialize is a good tool for creating normal maps, height maps, occlusion, etc. It automatically generates these maps directly from any image you provide!
NOTE
The material preview in Unity will not match the material preview in Materialize. The preview in Unity is how your material will look in-game!
This video will explain how materialize works:
https://www.youtube.com/watch?v=zKYr3Ca-xqg&t=1s is not a valid YouTube URL!
A tip for adjusting the map settings; By default the settings will look like this:
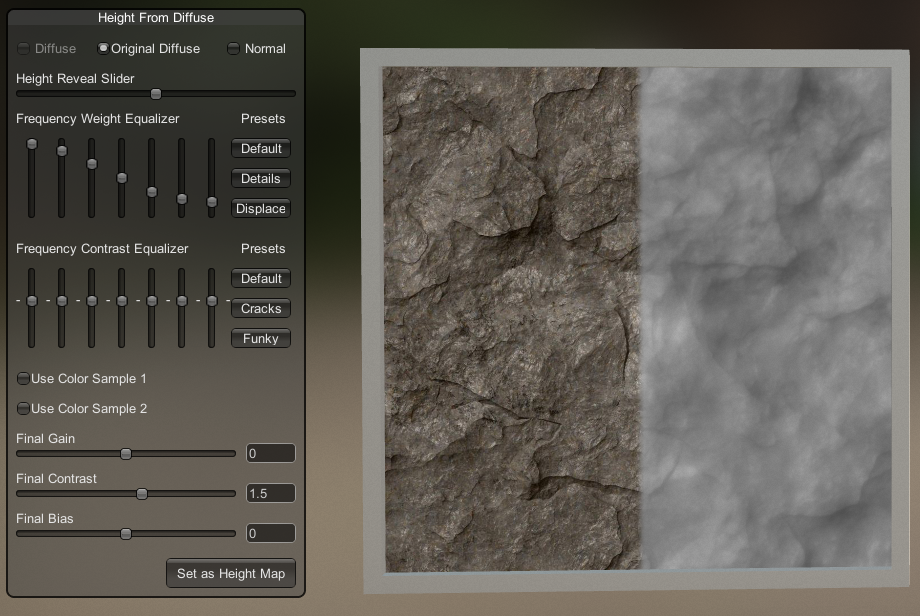
You can add contrast to the images by adjusting the gain and the final contrast in the settings.
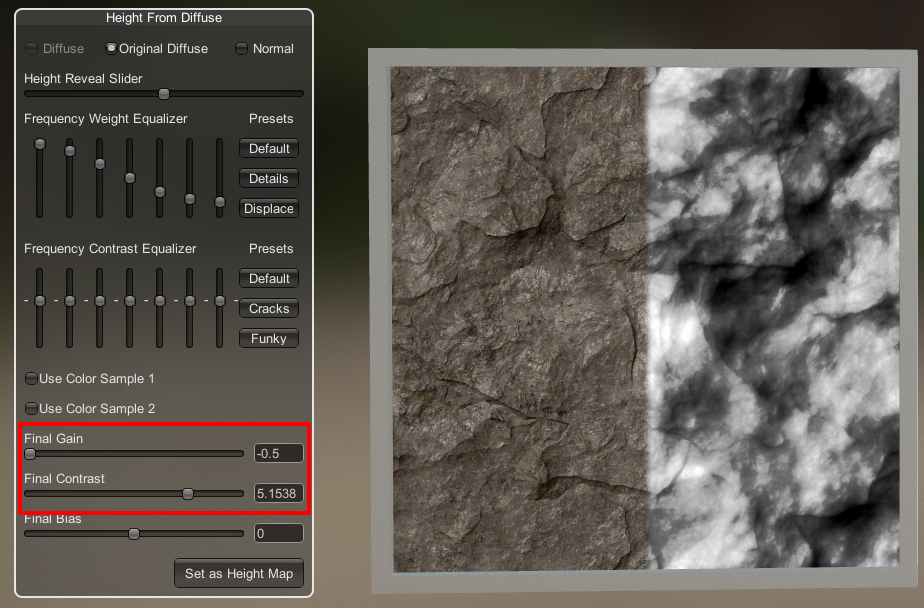
A harder image will result in much more influence while a softer image would result in less.
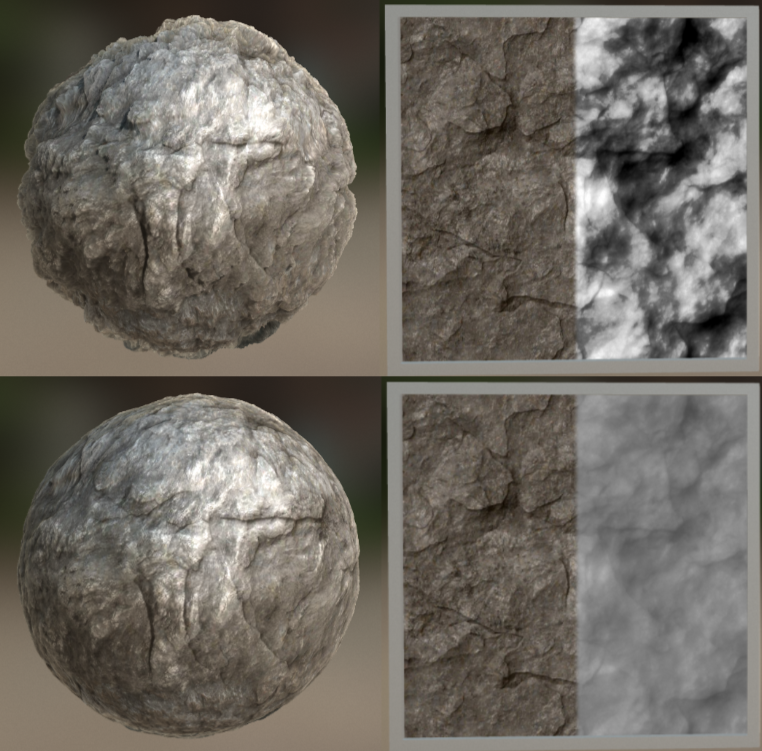
You can change the settings of the other maps too by adjusting any sliders that have "contrast" in the name.
Melodi Unlit- AlexxSeven
You can obtain this from AlexxSeven's Discord in this channel.
Melodi is a good shader that can achieve many effects including Audio Link and custom colors.
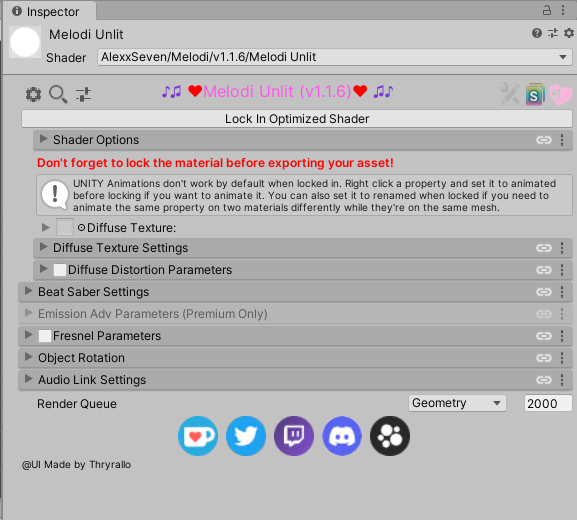
Here is a breakdown of some parts of the shader (Not all are listed to keep things simple):
- Shader options
- Shader lit mode: Can change between Unlit and physical (if you have the premium version).
- Cull Mode: Can change the culling to front, back, or off.
https://www.youtube.com/watch?v=a2qCEbmmKP4 is not a valid YouTube URL!
- Alpha mode: Can change between opaque, cutout, transparent and more.
- Cutoff(If cutout is selected): This slider is for adjusting how much of the image is being cut out when using a transparent image texture.
- Diffuse Texture
- This is where you put your image texture.
NOTE
There is a bug with version 1.1.16 of Melodi when first adding an Image Texture to the Diffuse Texture. Here is a quick fix:
https://www.youtube.com/watch?v=iQfuHDWiS0o is not a valid YouTube URL!
- Diffuse Texture Settings
- Texture Mode: Can switch between Matcap, Surface and Screen Space (if you have the premium version).
- Shift Texture Angle: This changes the angle that the texture shifts when animating it.
- Animation Speed: Changes the textures animation speed.
- Shift Animation Direction: Changes the direction that the texture is animated. Checking the
Invert Directioncheckbox will reverse the direction of the animation.
- Diffuse Distortion Parameters
- Normal Map: Adding a normal map adds distortion to your object. This can be used for making water or adding any other distortion effects.
- Normal Scale: This will change how much distortion you are giving your object.
https://www.youtube.com/watch?v=xbMIzPK2jwc is not a valid YouTube URL!
- Beat Saber Settings
- Color Type: Can change between using a solid color or a gradient.
- Custom Colors: Uses the players set of colors they choose in-game.
- Fresnel Parameters
- Fresnel Power and Scale: Can change how the fresnel looks.
- Fresnel Mask Settings: Can add textures to your fresnel for additional effects.
- Color Options: This changes the color of your fresnel.
https://www.youtube.com/watch?v=3axnNpdRb8w is not a valid YouTube URL!
Audio Link Setup
WARNING
The testing preview in the project may not exactly match the behavior in-game.
Be sure to test your model in-game to see the actual results!
It is recommended to download the minimal Unity package for easy setup. Import the package in Unity. Once imported you will want to go into your projects packages and locate the AudioLinkAvatar prefab in Packages/AudioLink/Runtime and drag it into your scene.
![]()
You have 2 options for using audio. One of them is using an audio clip by selecting the AudioLinkInput gameObject. Then drag your audio clip into AudioCLip.
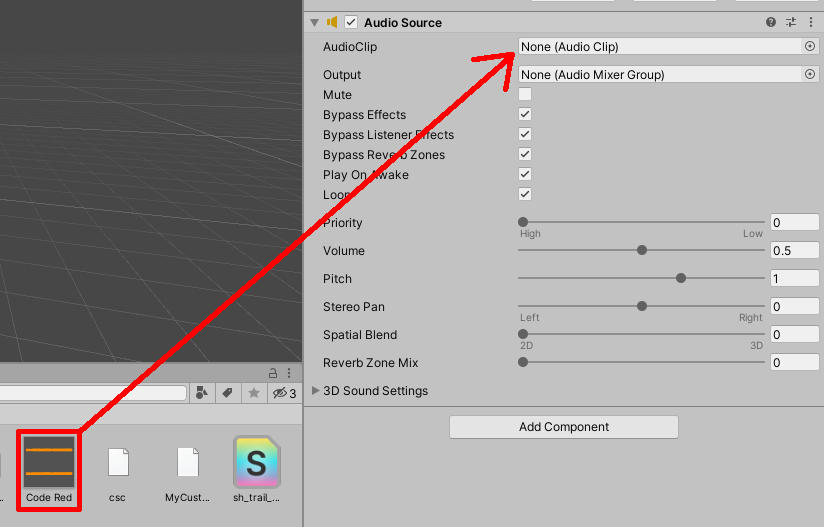
The other option is using a Youtube link to play an audio clip. Select the AudioLinkYtdlpPlayer gameObject and paste a Youtube link in the YtdlpPlayer script.

Make sure to add an audio listener component to the AudioLinkAvatar gameObject. When you click play in Unity, your audio should start playing.
Audio Link Settings
Diffuse Texture Animation: This will make the texture rotate based on the audio band settings.
Color Flashing: This will make your material flash based on the audio band settings and the color assigned to it.
Glow Pump: This is an additive effect that will scale on top of initial glow value (This feature is only seen in-game). Parts of the effect can be changed with the audio band settings.
https://youtu.be/MTjwqI7rUYA is not a valid YouTube URL!
Object Scale: This will change the objects scale based on the audio band settings.
IMPORTANT NOTE
This option uses vertex based animation. It scales it based on how the normals are set up. The following examples show a smooth shaded object (left) and a flat shaded object (right). Compared to each other they behave very differently!!!!
https://youtu.be/aK0Rnfs0Kbs is not a valid YouTube URL!
There are 2 types of volume sensitivity in the audio band settings for object scale: Default and curve based (for the premium version).
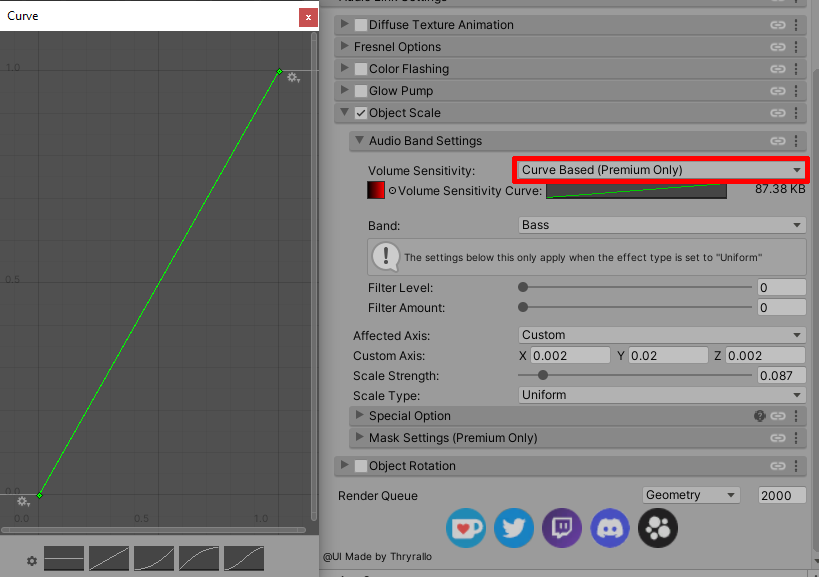
You can change the way the object scale behaves by adjusting the curve. There are a lot of effects you can achieve. If, for example, you want your objects to have a roll effect, you can loop the curve like shown:
https://youtu.be/6Hx4BRGb6hM is not a valid YouTube URL!
Song used in the video: Overthrone (Metal Version) - longestsoloever
Object Rotation: This will change the objects rotation based on the audio band settings.
https://www.youtube.com/watch?v=hYcM8pP0lak is not a valid YouTube URL!
Song used in the video: Code Red - longestsoloever
Here are some examples using the Melodi shader. Get creative!
https://youtu.be/KtZ8onsptMg is not a valid YouTube URL!
https://youtu.be/9X7pus4WXUQ is not a valid YouTube URL!
Fire Trail Shader - Ikeiwa
You can obtain this shader from Ikeiwa's GitHub.
This is one of the most well known shaders for making animated trails for sabers. It is super simple to use.
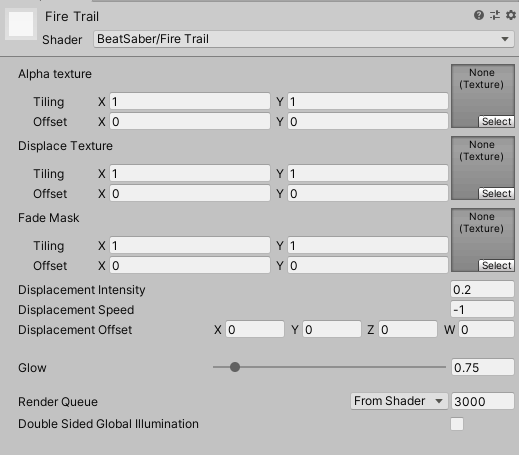
Breakdown of the Fire Trail Shader:
- Alpha Texture: This is where you would put your trail shape image.
- Displace Texture: This adds the "flame" effect to your trails, making them animated.
- Fade Mask: This where you would put the texture of your trail.
- Displacement Intensity: This changes how much of the trail shape is cut off.
- Displacement Speed: Changes the speed of the animated trail.
- Displacement Offset: Offsets the displacement of the trail.
- Glow: Changes how bright the glow is on the trail.
https://www.youtube.com/watch?v=1vFDpYoEXXo is not a valid YouTube URL!
NOTE
When making an animated trail, make sure that your trail image's wrap mode is set to clamp otherwise your trail will have unwanted edges.
https://youtu.be/VL9rWhPEL4M is not a valid YouTube URL!
Here is the template trail:
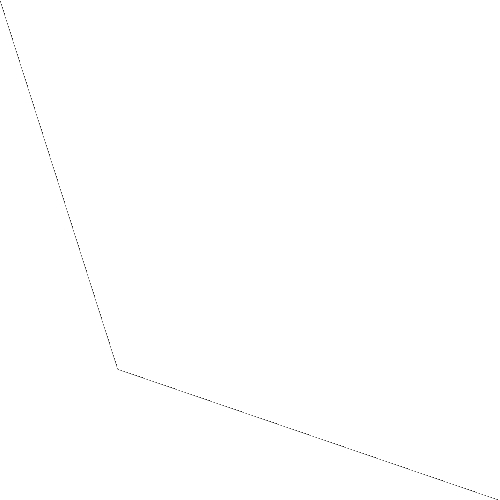
To preview a trail simply just drag your trail material onto a plane.
Glass Refraction (Premium Only) - AlexxSeven
This is a paid shader you can obtain from AlexxSeven's Discord
This shader is great for adding glass effects to your models. You can also add distortion to your glass to give it some extra effect and it has custom color support.
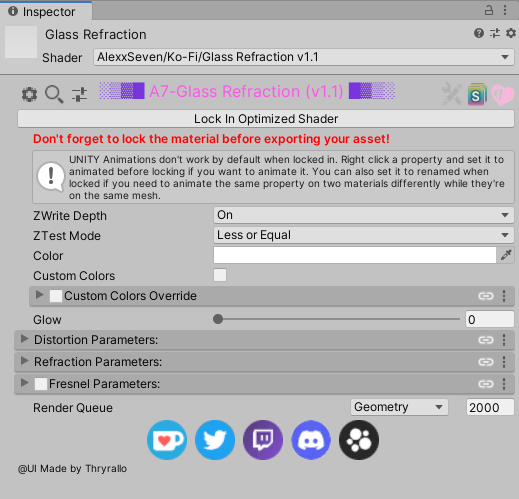
Here is a breakdown of the Glass Refraction shader (Not all are listed to keep things simple):
- Color: Changes the base color of the glass.
- Custom Colors: Allows the player to adjust the base color of the glass based on their presets in-game.
- Custom Colors Override: Enabling this option will override custom colors in favor of the color source chosen. These are:
- Object Vertex Color: Changes the color of the glass to the objects base color.
- Saber Left: Changes the color of the glass to the same color as the Left Saber.
- Saber Right: Changes the color of the glass to the same color as the Right Saber.
- Distortion Parameters: You can add effects to the glass that distort the objects behind it using a normal map.
https://youtu.be/Z1kkpaw2jXQ is not a valid YouTube URL!
- Refraction Parameters: Adds additional glass effects.
https://youtu.be/xwdo7ZAgg5w is not a valid YouTube URL!
- Fresnel Parameters: Adds Fresnel to your glass.
- Fresnel Power and Scale: Can change how the fresnel looks.
- Fresnel Mask : Can add textures to your fresnel for additional effects.
- Color: This changes the color of your fresnel.
- Fresnel Distortion: Can distort your fresnel for additional effects.
https://www.youtube.com/watch?v=LuBPlU53m8c is not a valid YouTube URL!
Render Queue
Render queue is a way of specifying which objects to render first by using tags assigned to the shader. For most shaders by default, the render queue will be set to 2000.
NOTE
This is most likely going to be utilized for things like glass refraction or transparency for objects.
There are different rendering types, each with its own set value.

- From Shader: 2000
- Geometry: 2000
- AlphaTest: 2450
- Transparent: 3000
To keep this simple, the glass refraction shader made by AlexxSeven will be used as an example. All 3 of the shaders have a queue set to 2000.
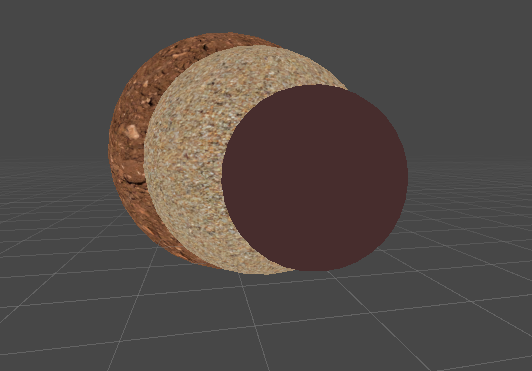
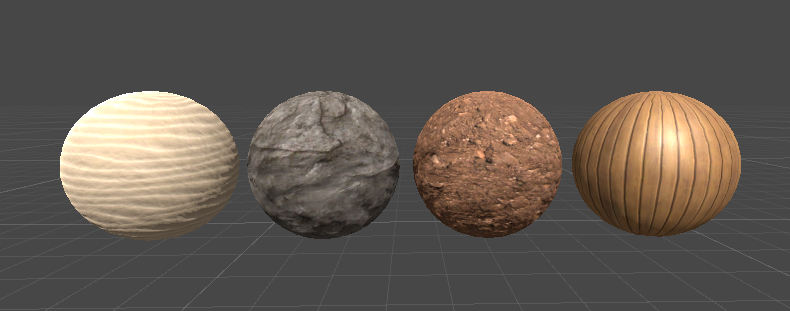
As you can see here, the other objects cannot be seen through the glass refraction shader. This is because they are on the same layer. By changing the sand's render queue to 1999, we get this result:
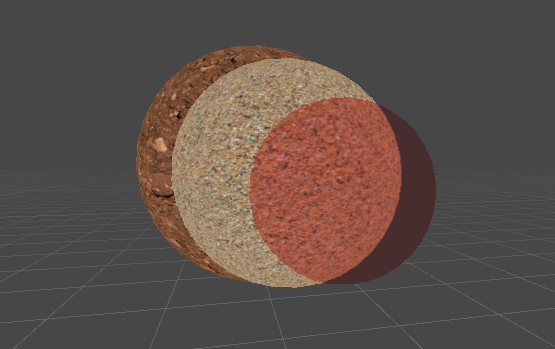
The sand can now be seen through the glass because the sand's render queue is set to a lower number than the glass refraction. Think of the queue as layers. For this next example, each material is set to the following:
- Dirt: 1999
- Sand: 2001
- Glass: 2000
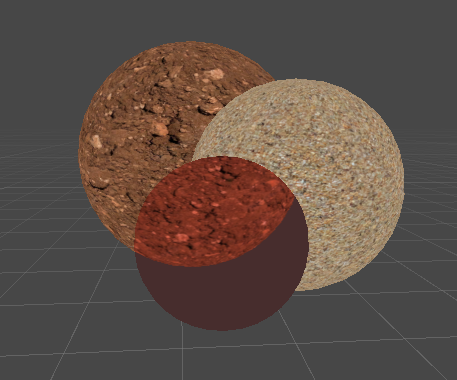
The dirt is on a lower number than the sand is. This causes the dirt to be rendered over the sand. If you want your objects to be seen through the glass refraction shader, make sure your objects render queue is set to a value lower than the glass refraction's!
NOTE
The default ui in-game has a render queue set to 3000.